When Static Roles Are Not Enough: Dynamic Admin Assignment for Entra AUs
Automating scoped admin access for Entra AUs
Welcome to my new blog post
Klicke hier, wenn Du lieber in Deutsch lesen möchtest
English version
Quick basic introduction
Administrative Units (AUs) are a powerful feature in Microsoft Entra ID. They allow you to group user accounts, groups, or devices and manage them collectively based on specific administrative requirements.
AUs are often confused with Organizational Units (OUs) from Active Directory Domain Services, but they share nothing in common beyond a similar name. Administrative Units are designed purely for delegation: they allow you to scope administrative permissions so that administrators can manage only the objects contained within a specific AU.
 Figure 1: Administrative Units
One of the most powerful aspects of Administrative Units is their support for dynamic membership rules. Objects can be placed into an AU automatically based on specific attributes. Common examples include attributes such as extensionAttributes or the department attribute or other. By using dynamic membership rules, user accounts can be automatically collected into the appropriate Administrative Units without manual intervention.
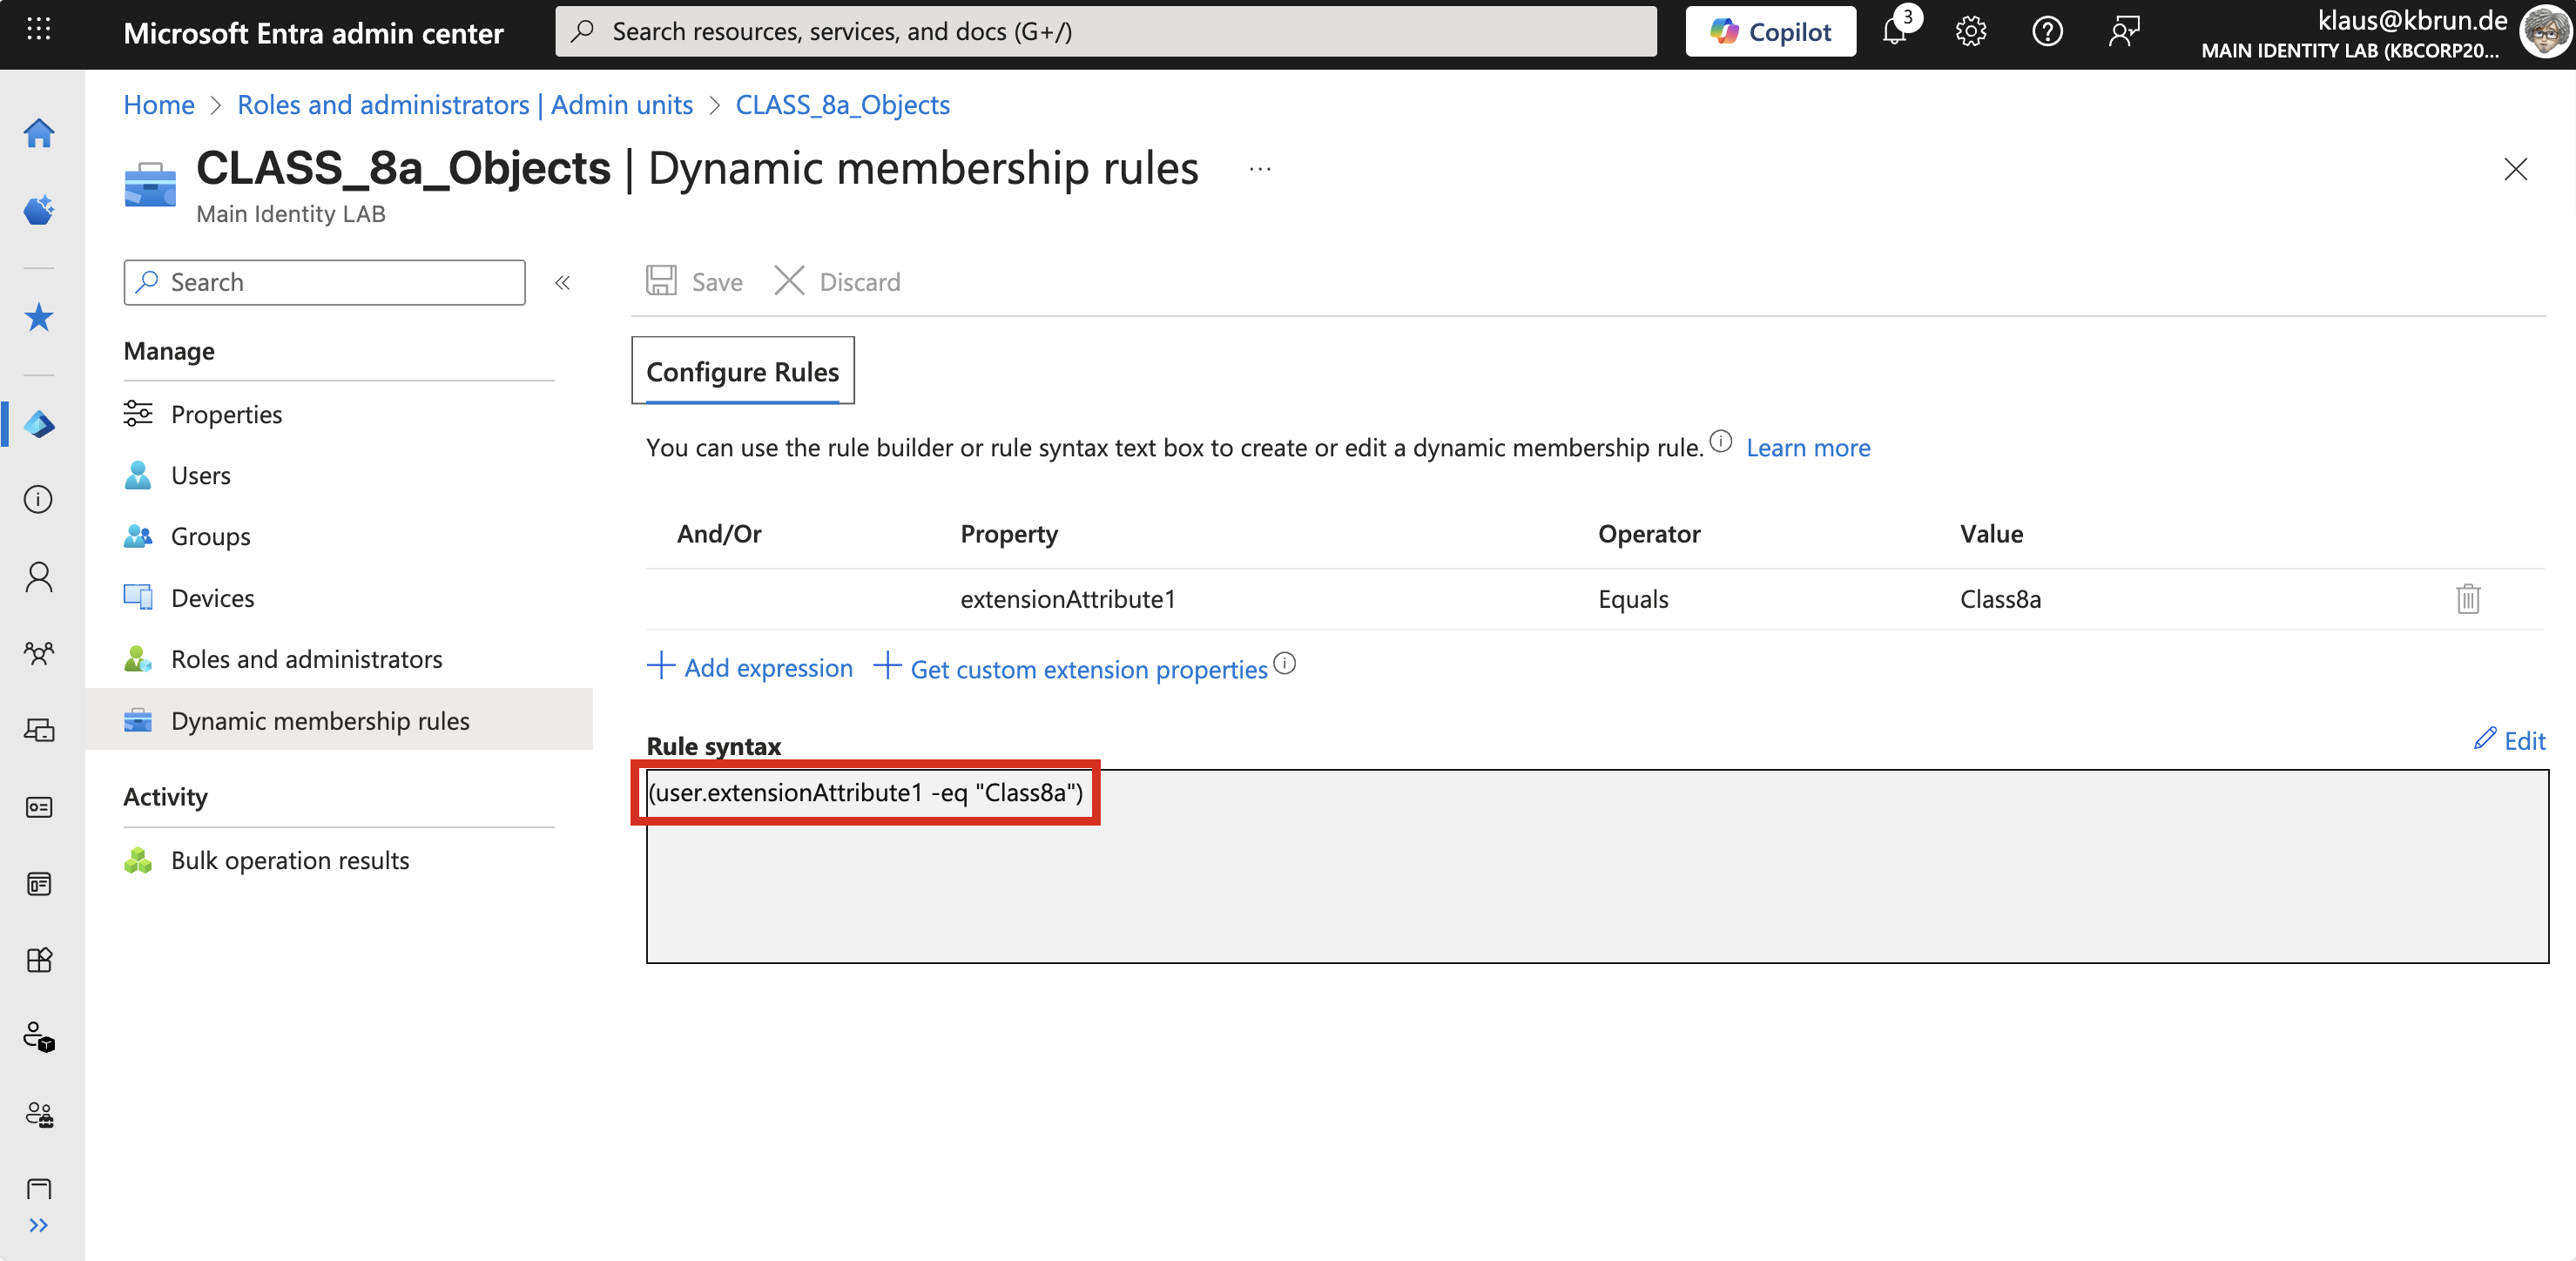 Figure 2: Administrative Unit - dynamic membership rule
Objects in Microsoft Entra ID can belong to multiple Administrative Units at the same time, which further increases the flexibility of delegation. A typical example is the use of AUs for projects. If an employee is involved in multiple projects, their account can be a member of all corresponding Administrative Units.
➜ Important
One aspect of delegating permissions with Administrative Units is the fact that administrative roles can only be assigned manually and not dynamically in the way described above.
In my opinion, this is a good thing. Automatically assigning administrative privileges through background processes is something I consider critical. For good reason, Microsoft also does not allow PIM groups to be populated dynamically.
That said, there are scenarios where this kind of automation can make sense and where the associated risk is much lower.
A good example is the education sector. Imagine a school with class teachers who should be able to reset passwords or modify account properties only for the students in their own class. There are many similar examples, including in industrial environments. However, let’s stay with the school scenario, because it comes with a particular challenge.
The challenge
Once a year, at the end of the school year, the administrative scope for all class teachers has to be updated on a large scale to reflect their new classes. This means adjusting their administrative assignments to the corresponding Administrative Units.
This process is error-prone, time-consuming, and from a security perspective not particularly elegant.
As a result, this practically calls for automation.
How convenient would it be to automatically assign a specific role based on an attribute in the user object from a school teacher?
Before looking at a possible approach to automate this, let’s first examine the manual steps required if this process is handled without any automation. These steps are necessary for every teacher and for every class.
- Request and approval
- Select the Administrative Unit
- Select the role
- Select the user
- Define whether the assignment is eligible or permanent
Consider automation
And this has to be done for every Administrative Unit. It is time-consuming, tedious, and highly error-prone.
Now let’s move on to automation and take a look at what is required to automate this process.
The goal is to ensure that users whose employeeType attribute contains the value “Teacher”, and whose department attribute represents a school class, automatically receive administrative permissions for the Administrative Unit that corresponds to exactly that class.
To achieve this automation, we need the following components from Microsoft Entra ID and Entra Governance:
• PIM group - holds the role assignment for the class-specific Administrative Units
• Access Package - contains the PIM group
• Lifecycle Workflow for each school class
The workflow is triggered by a change to the department attribute, which contains the school class. The affected user accounts are assigned the corresponding Access Package and, as a result, receive the PIM group included in it.
The individual steps required to set up this automation are described below.
Setting up the group in PIM
First, we need the group. When creating the group, it is important to enable the option that allows roles to be assigned to it.
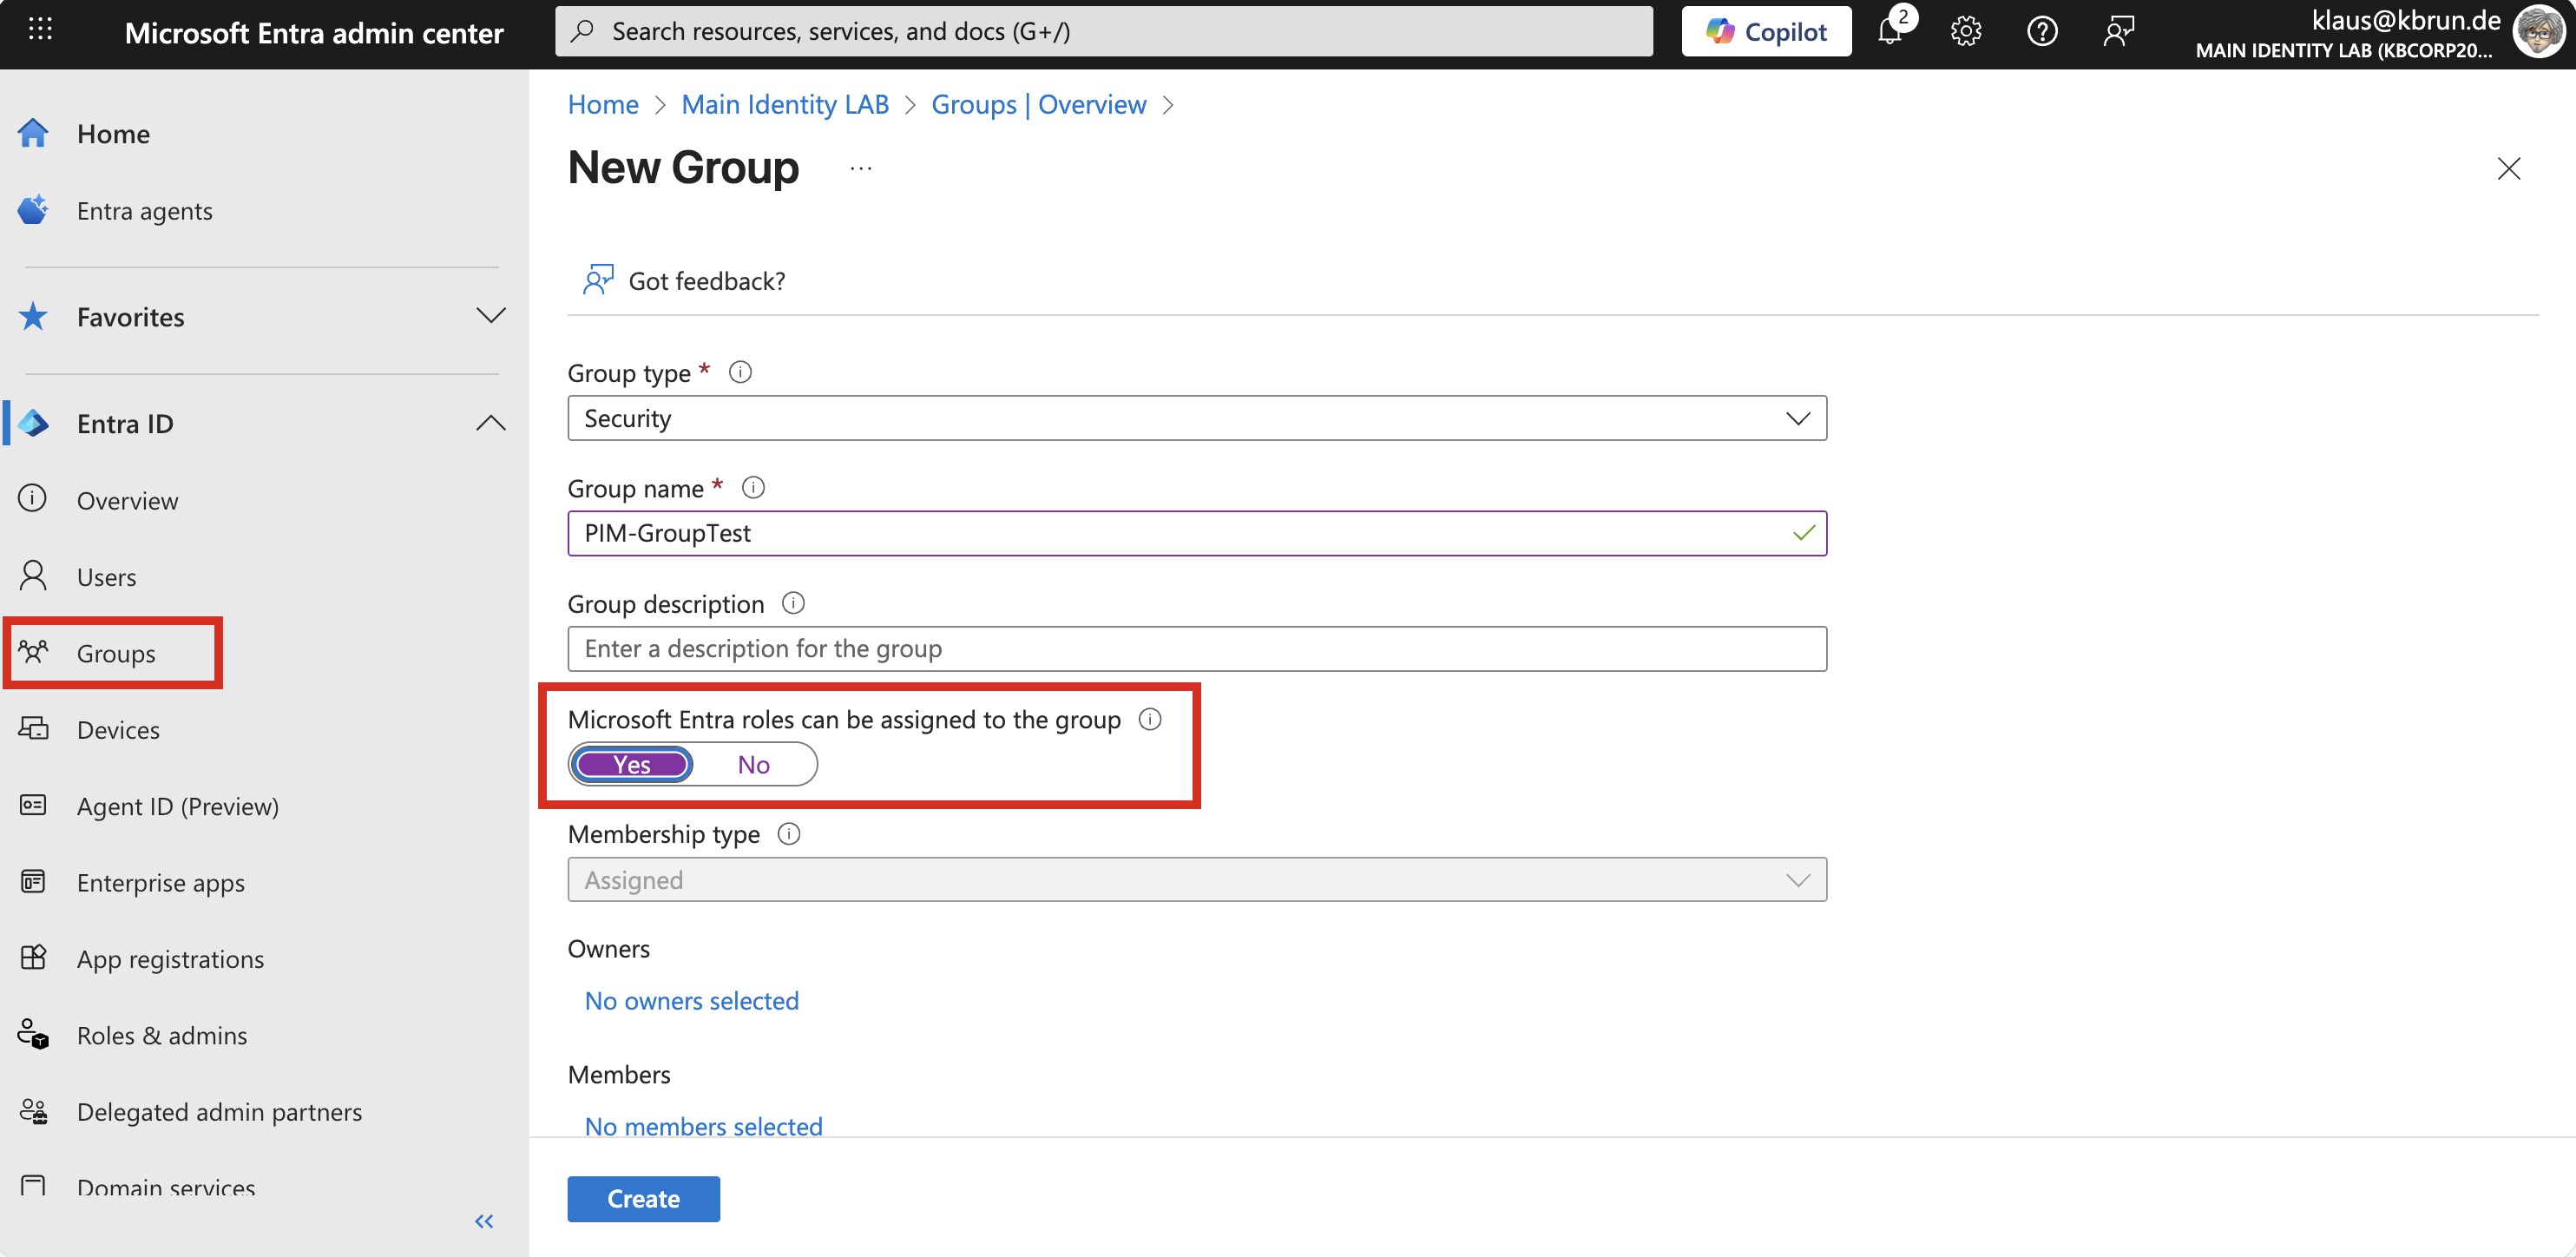 Figure 3: Create a security group with the role assignment option
Next, we move to the PIM dashboard. Here, the newly created group must be made available through the discovery process.
 Figure 4: Discover new groups in the PIM-Dashboard
This is done using the option “Discover groups”, which lists all groups in the tenant that were created with the option to assign roles to them, as shown during the group creation step above.
For the following example, we focus on a single school class. For this purpose, we created a PIM group named “PIM_Class_8a_Objects”, as shown in the figure above.
Group assignment strategy
There are two different strategies for connecting a group to a role in PIM, or in other words, for establishing the relationship between a user and an administrative role. A detailed explanation of both approaches can be found in another blog article: Demystifying Assignment Strategies with ‘PIM for Groups’
In this example, we assign the role to the group as an active assignment. Through the Lifecycle Workflow and the Access Package, teachers are added to the PIM group as active members. In this scenario, eligible assignments are not required
To do this, we stay in the PIM dashboard and navigate to Roles, then to Assignments, where we assign the “User Administrator” role to the group as an active assignment. It is important not to select “Directory” as the scope, but instead choose the corresponding Administrative Unit for class 8a.
With this configuration, all users who have an assignment in the group receive the User Administrator role scoped to the Administrative Unit of class 8a.
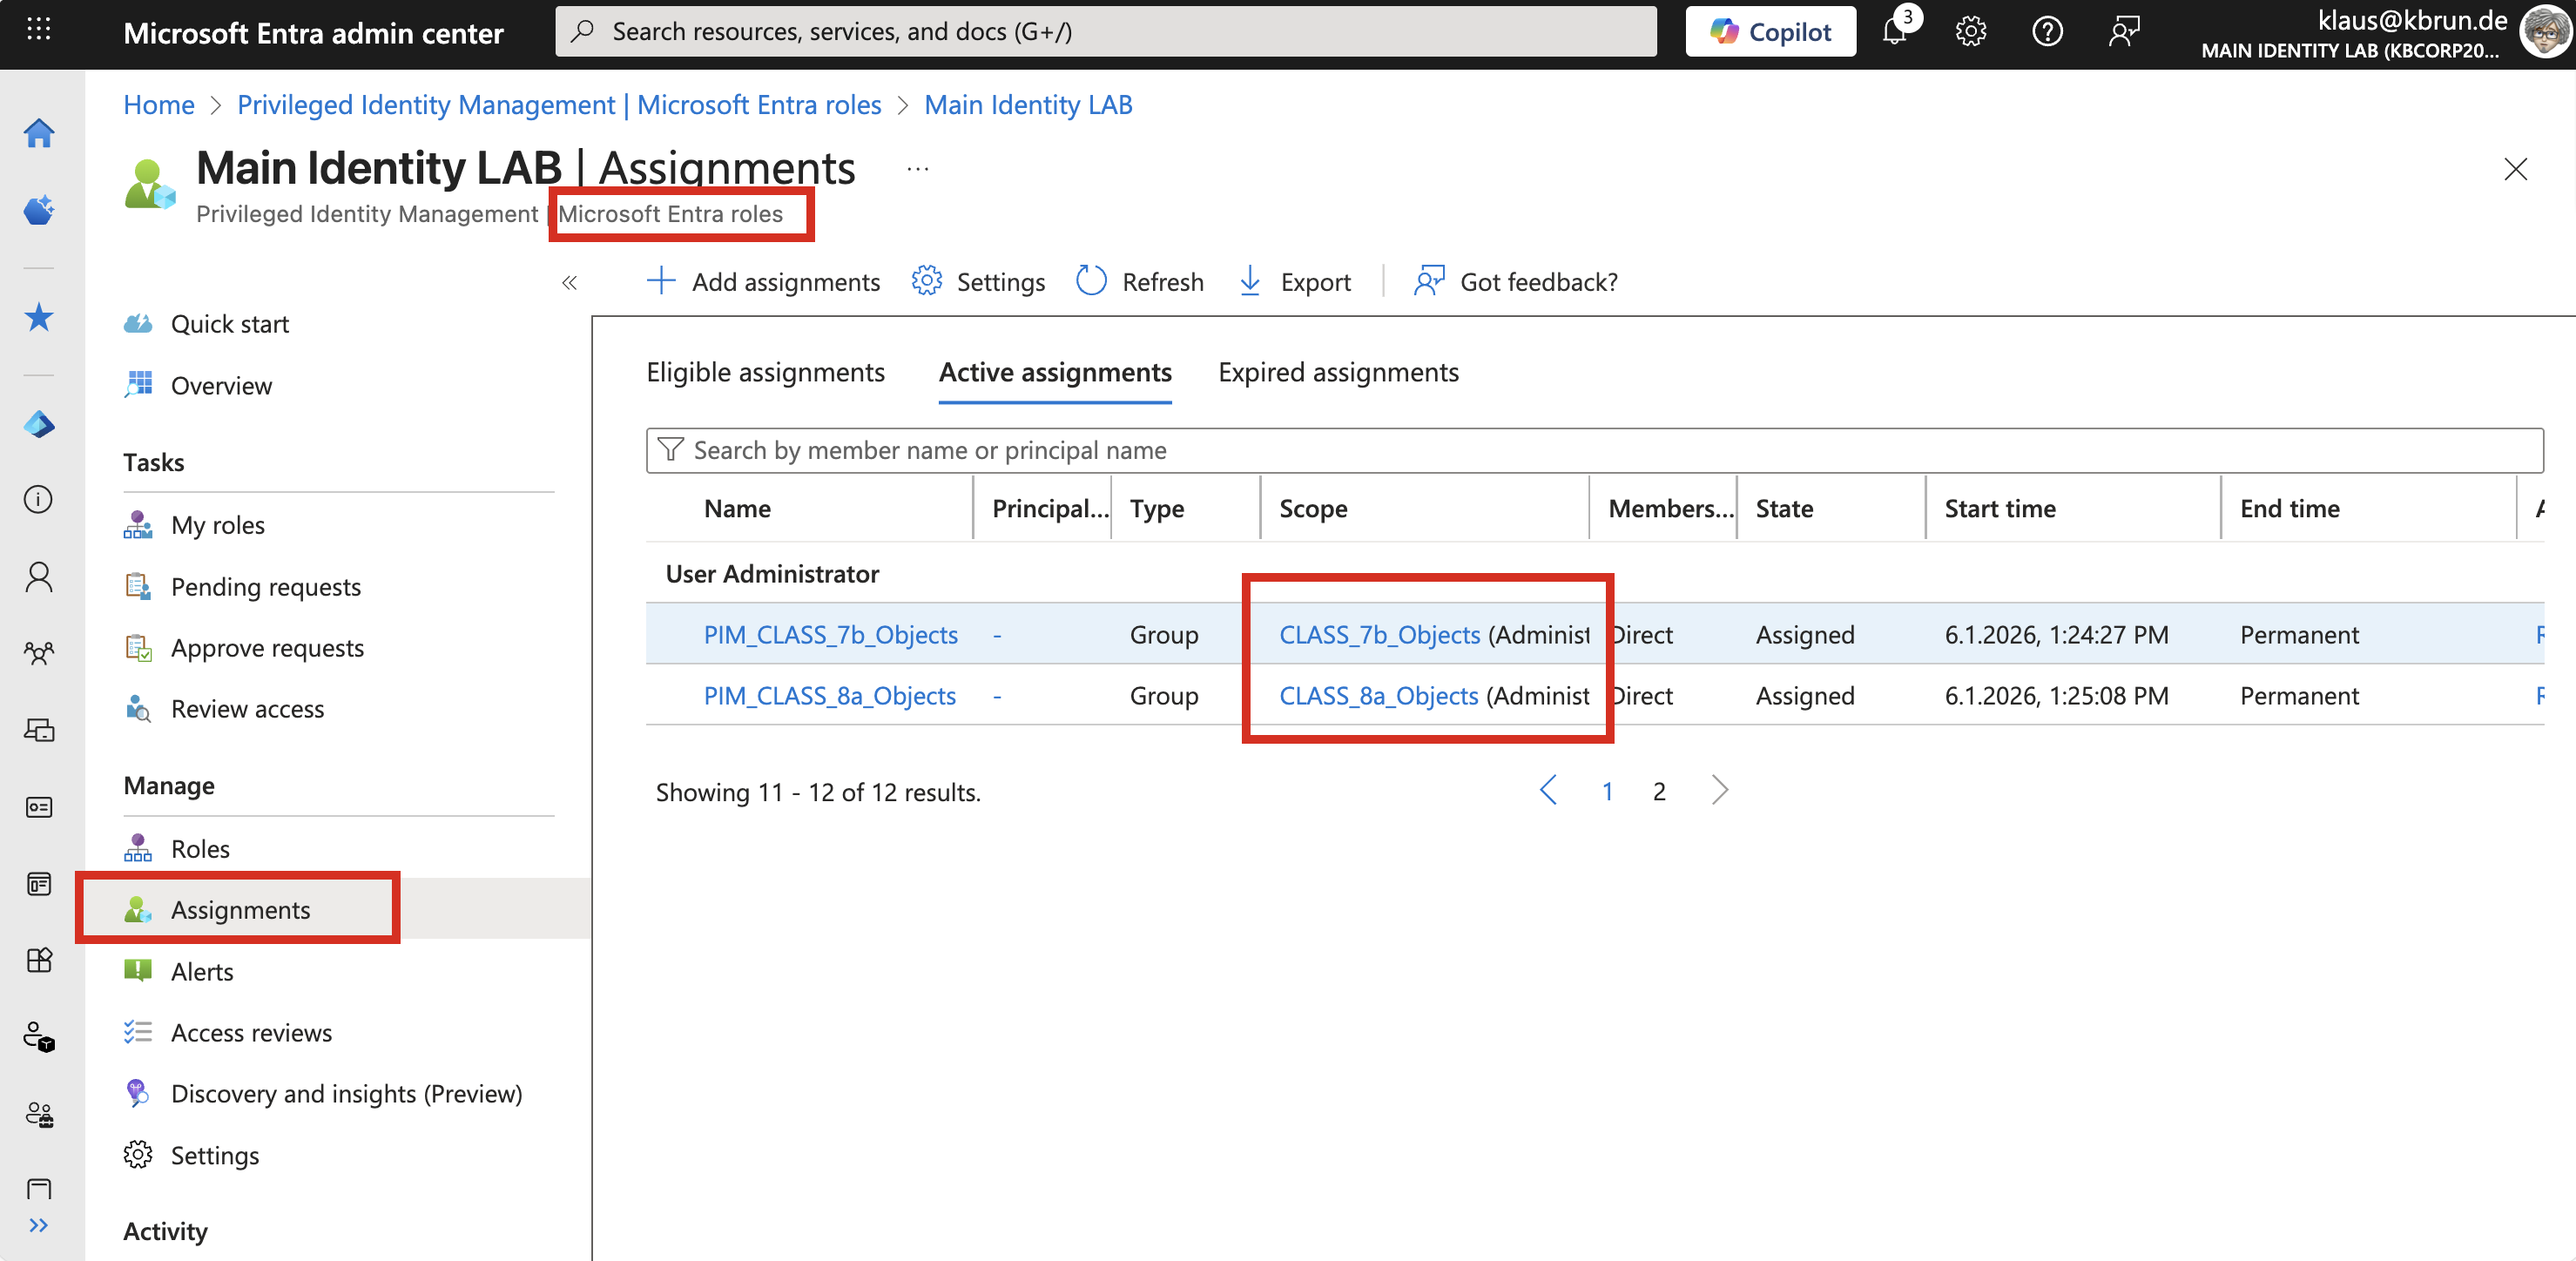 Figure 5: User Administator role assignment to specific class AU
At this point, we are done with PIM. If we decided against automation and wanted to handle everything manually, we could now assign users to the group as eligible members.
However, since our goal is automation, we leave PIM at this stage and move on to the component that actually performs the automation.
Setting up governance
Access Package
To create the Access Package, we navigate to Identity Governance in the Entra Admin Center.
Creating an Access Package is straightforward and intuitive. In our case, we created an access package for each class setup …
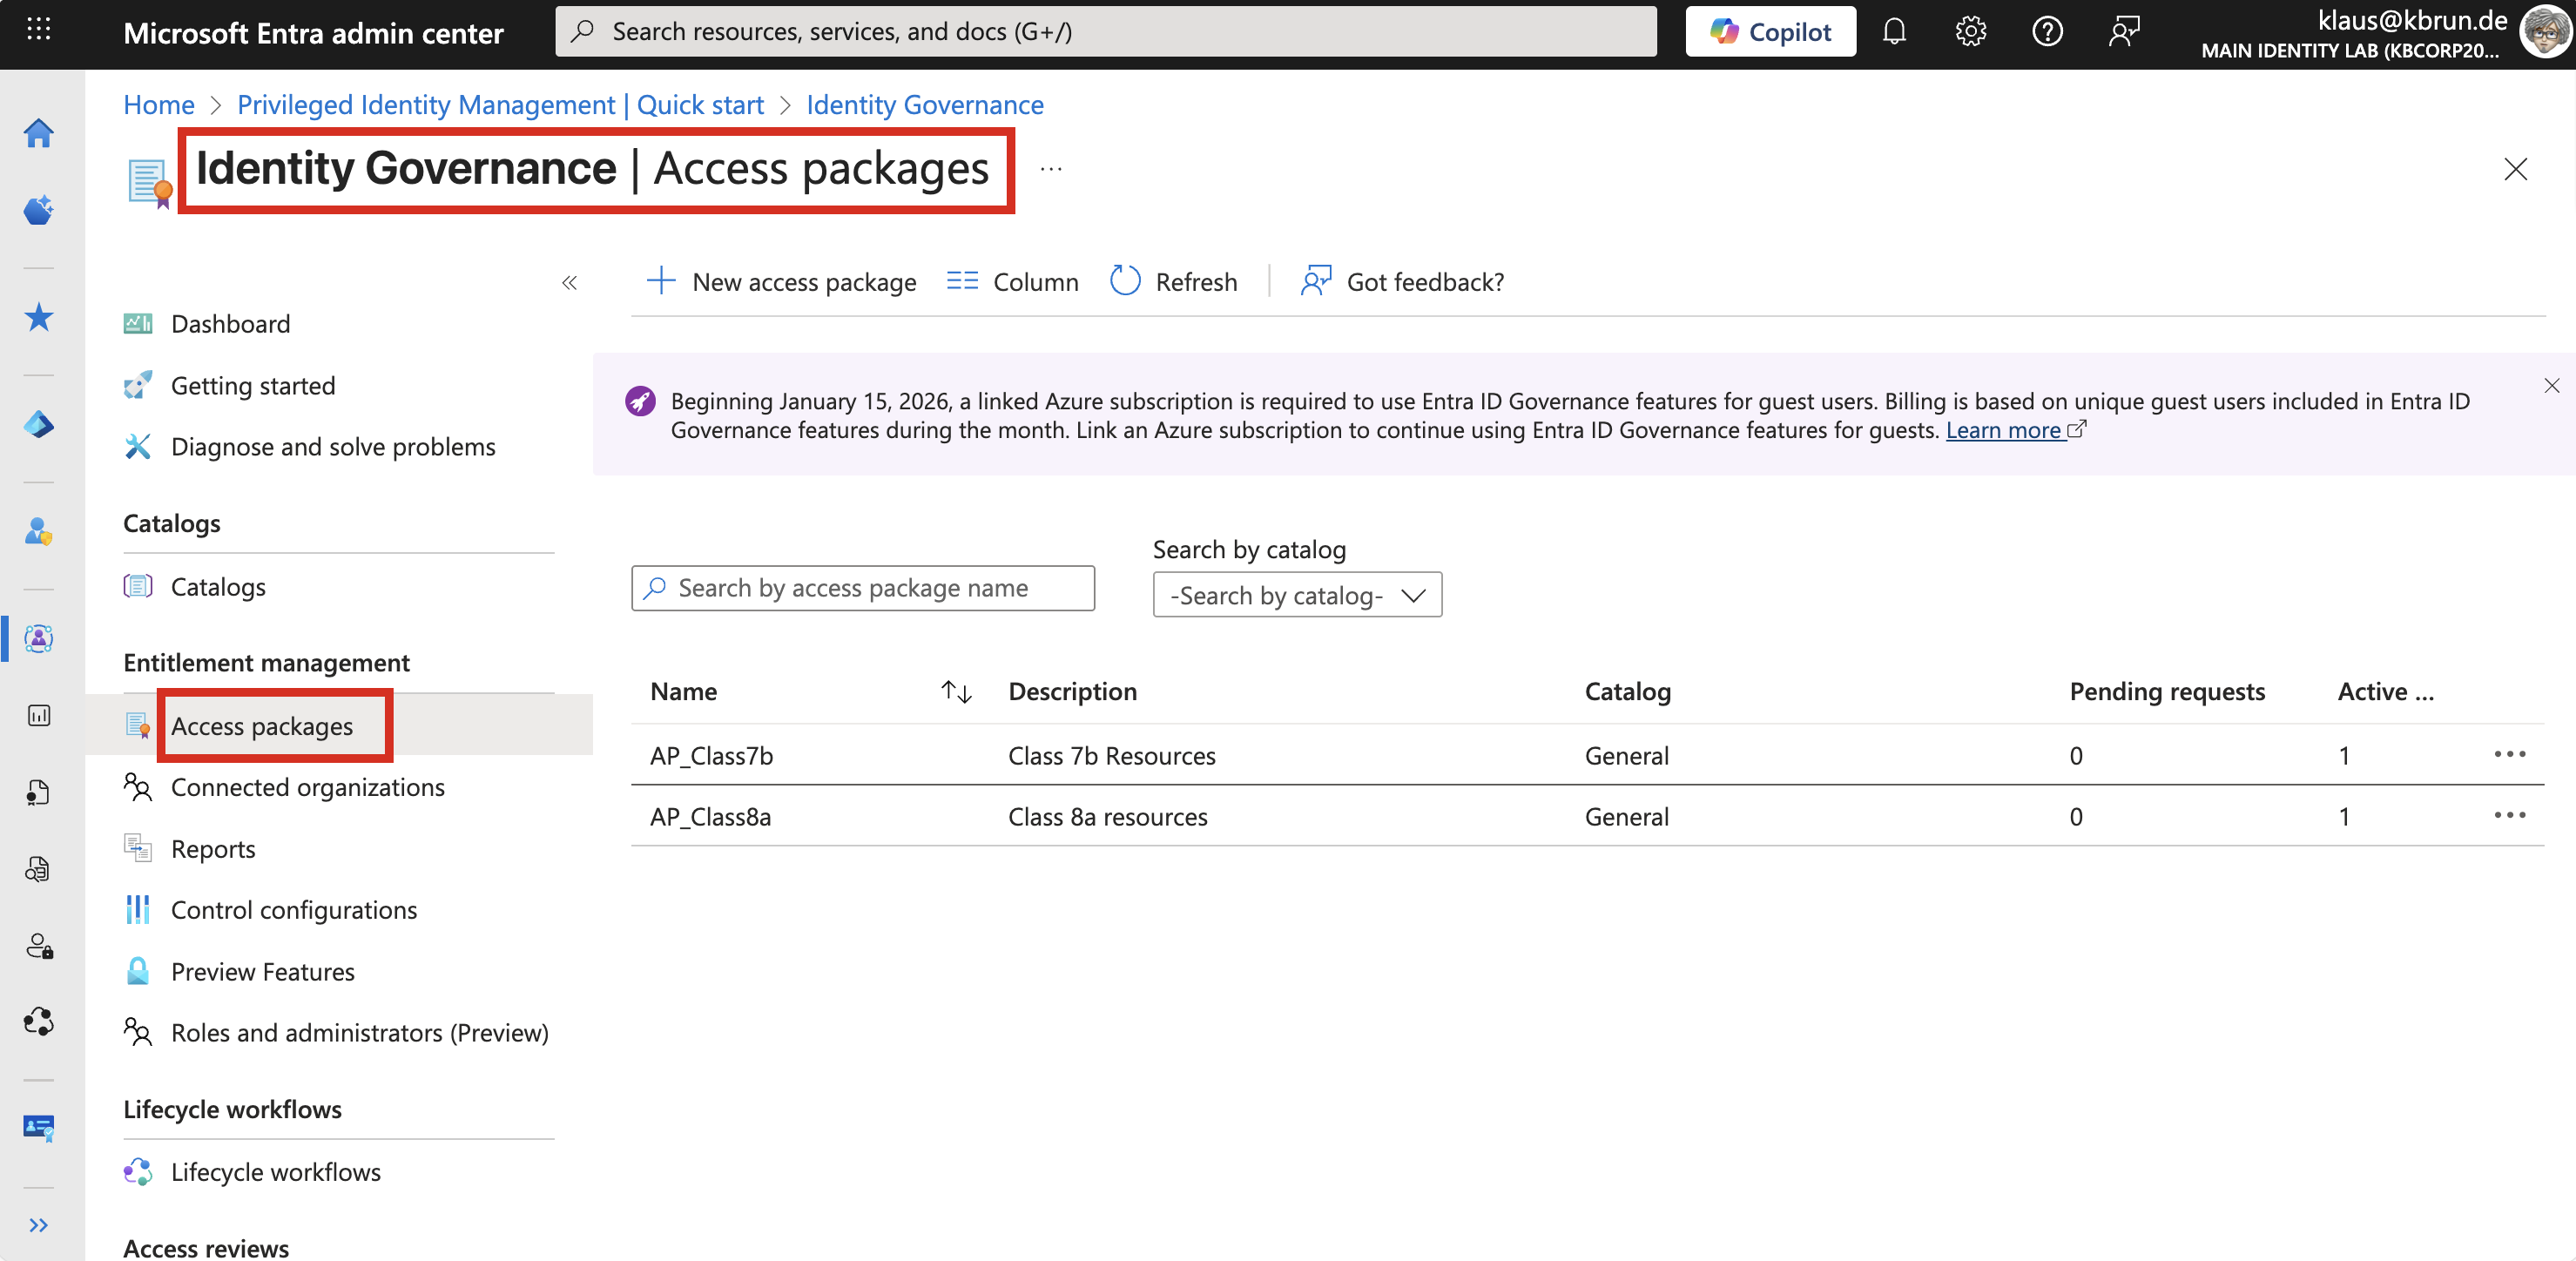 Figure 6: Each class has its own Access Package
… and the package contains in our example only the group as a resource. However, this could easily be extended by adding policies or additional resources to the Access Package.
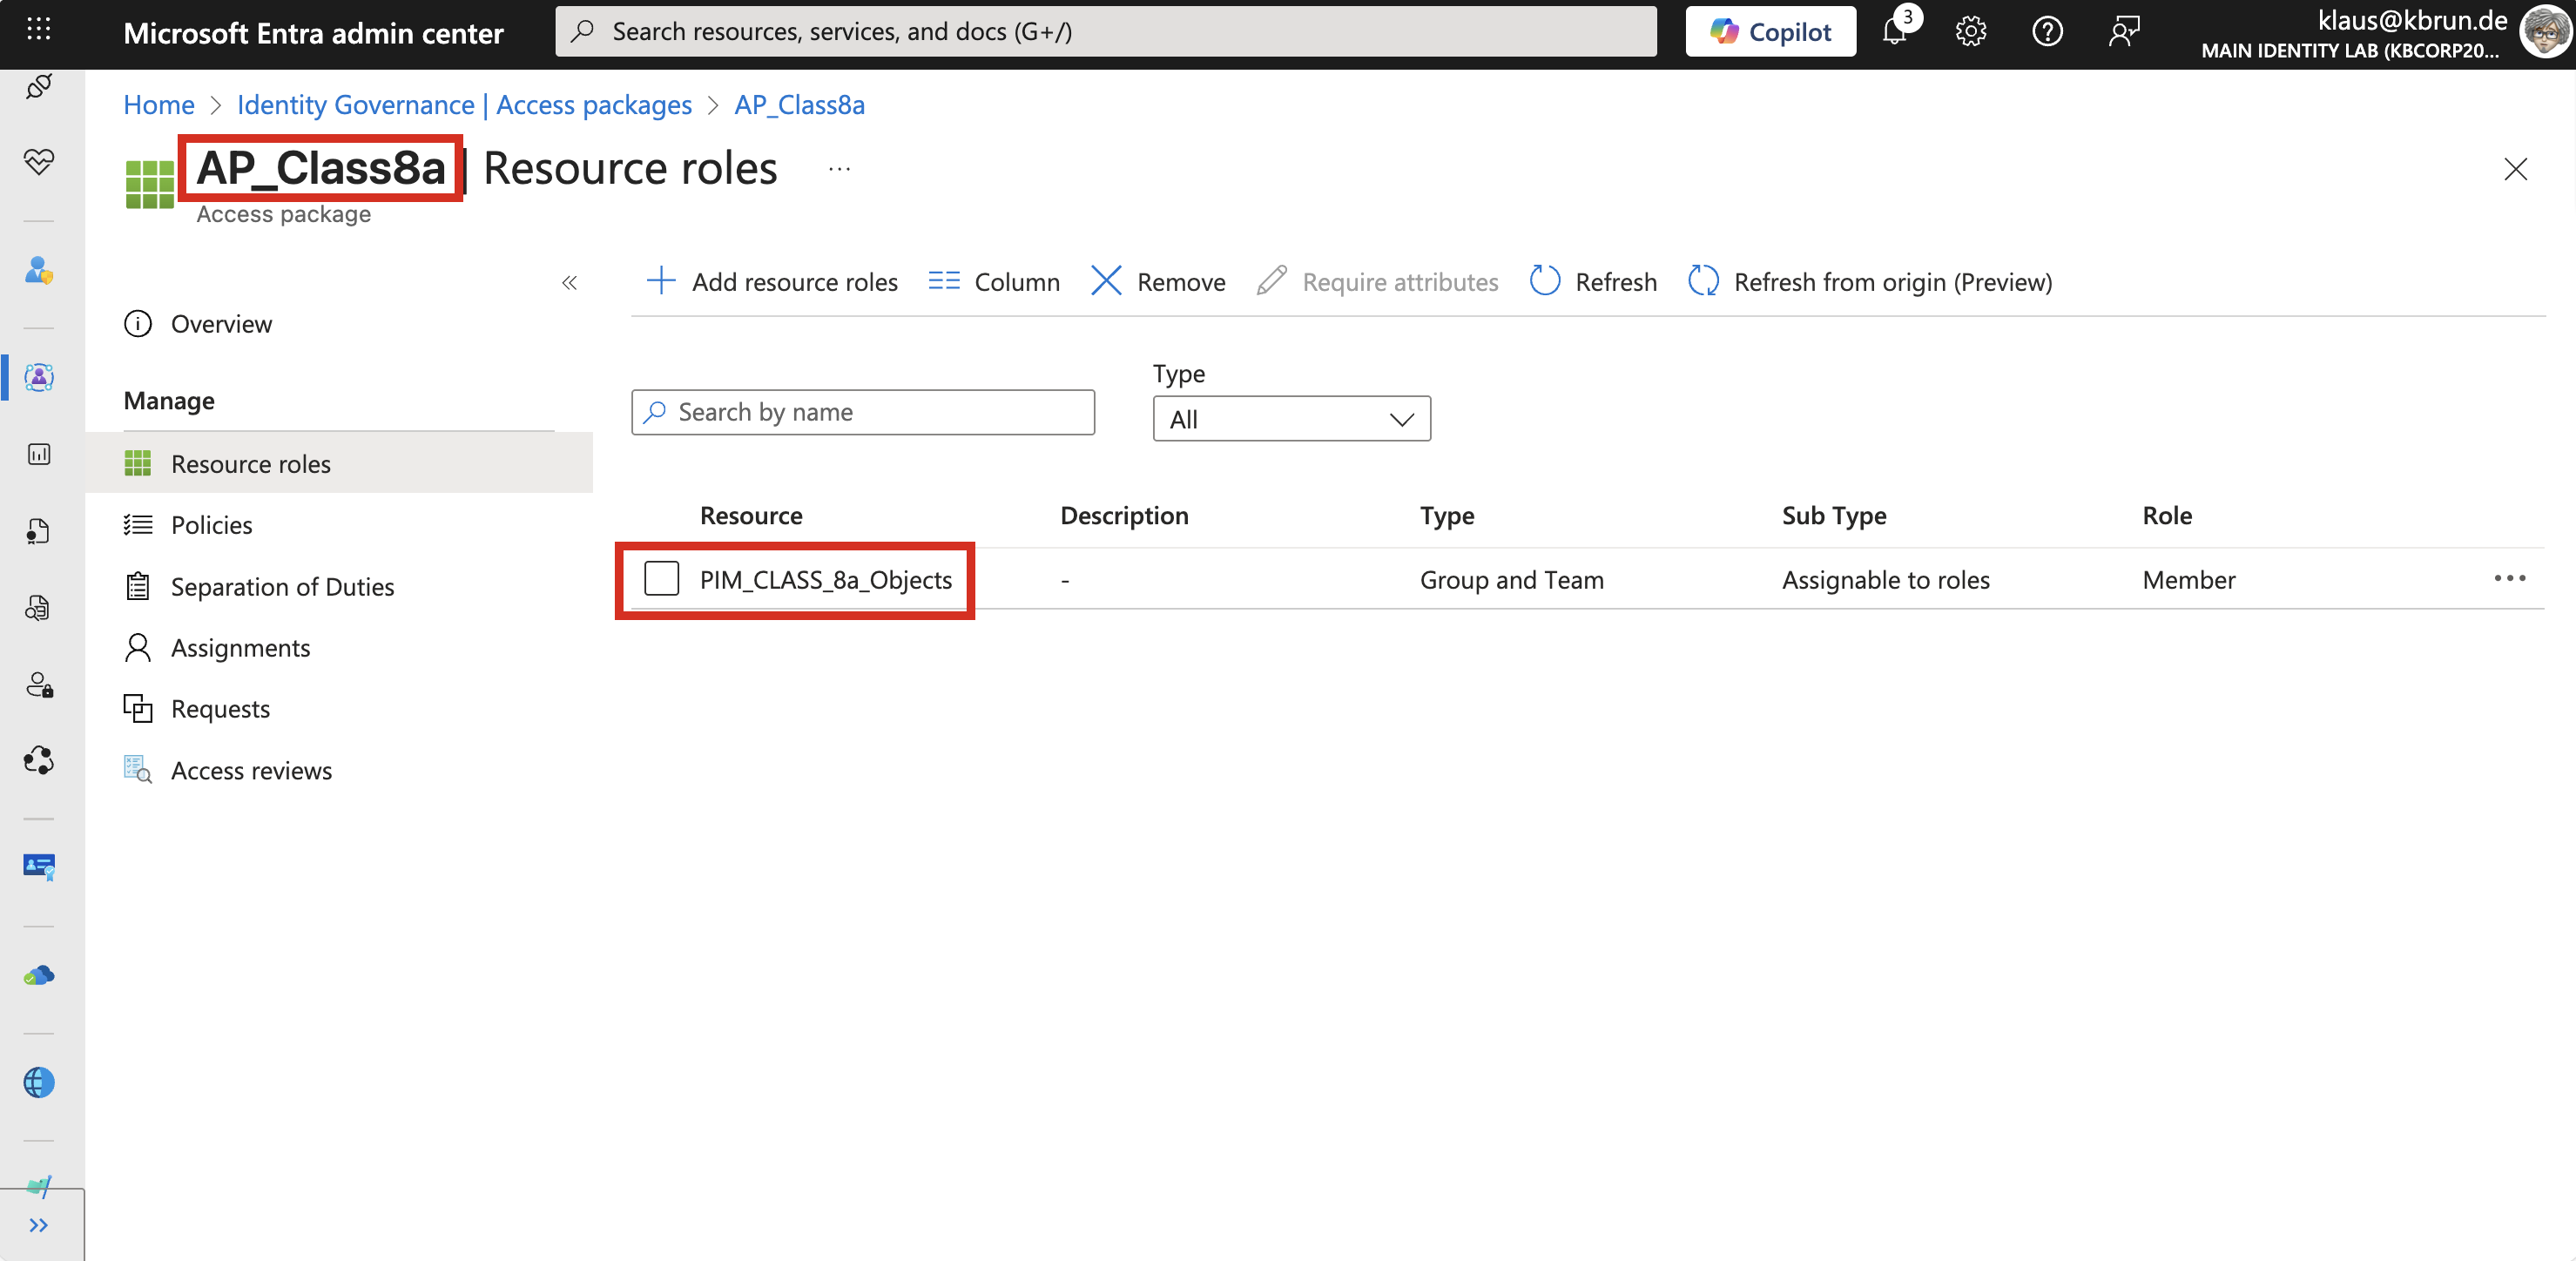 Figure 7: Access Package contains PIM-Group
In scenarios where administrators act only temporarily and assignments change frequently, this kind of dynamic approach can be helpful and does not necessarily introduce significant risk.
Lifecycle Workflow
The Lifecycle Workflow is the core of this approach. As the trigger type, we use a change to the department attribute, although many other attributes could be used as well.
When creating a workflow, we first have to choose a template. Depending on the selected template, different options are available for defining the scope, the trigger attribute, and the tasks. The available tasks also vary depending on the chosen template.
For our use case, we select the “Mover” template.
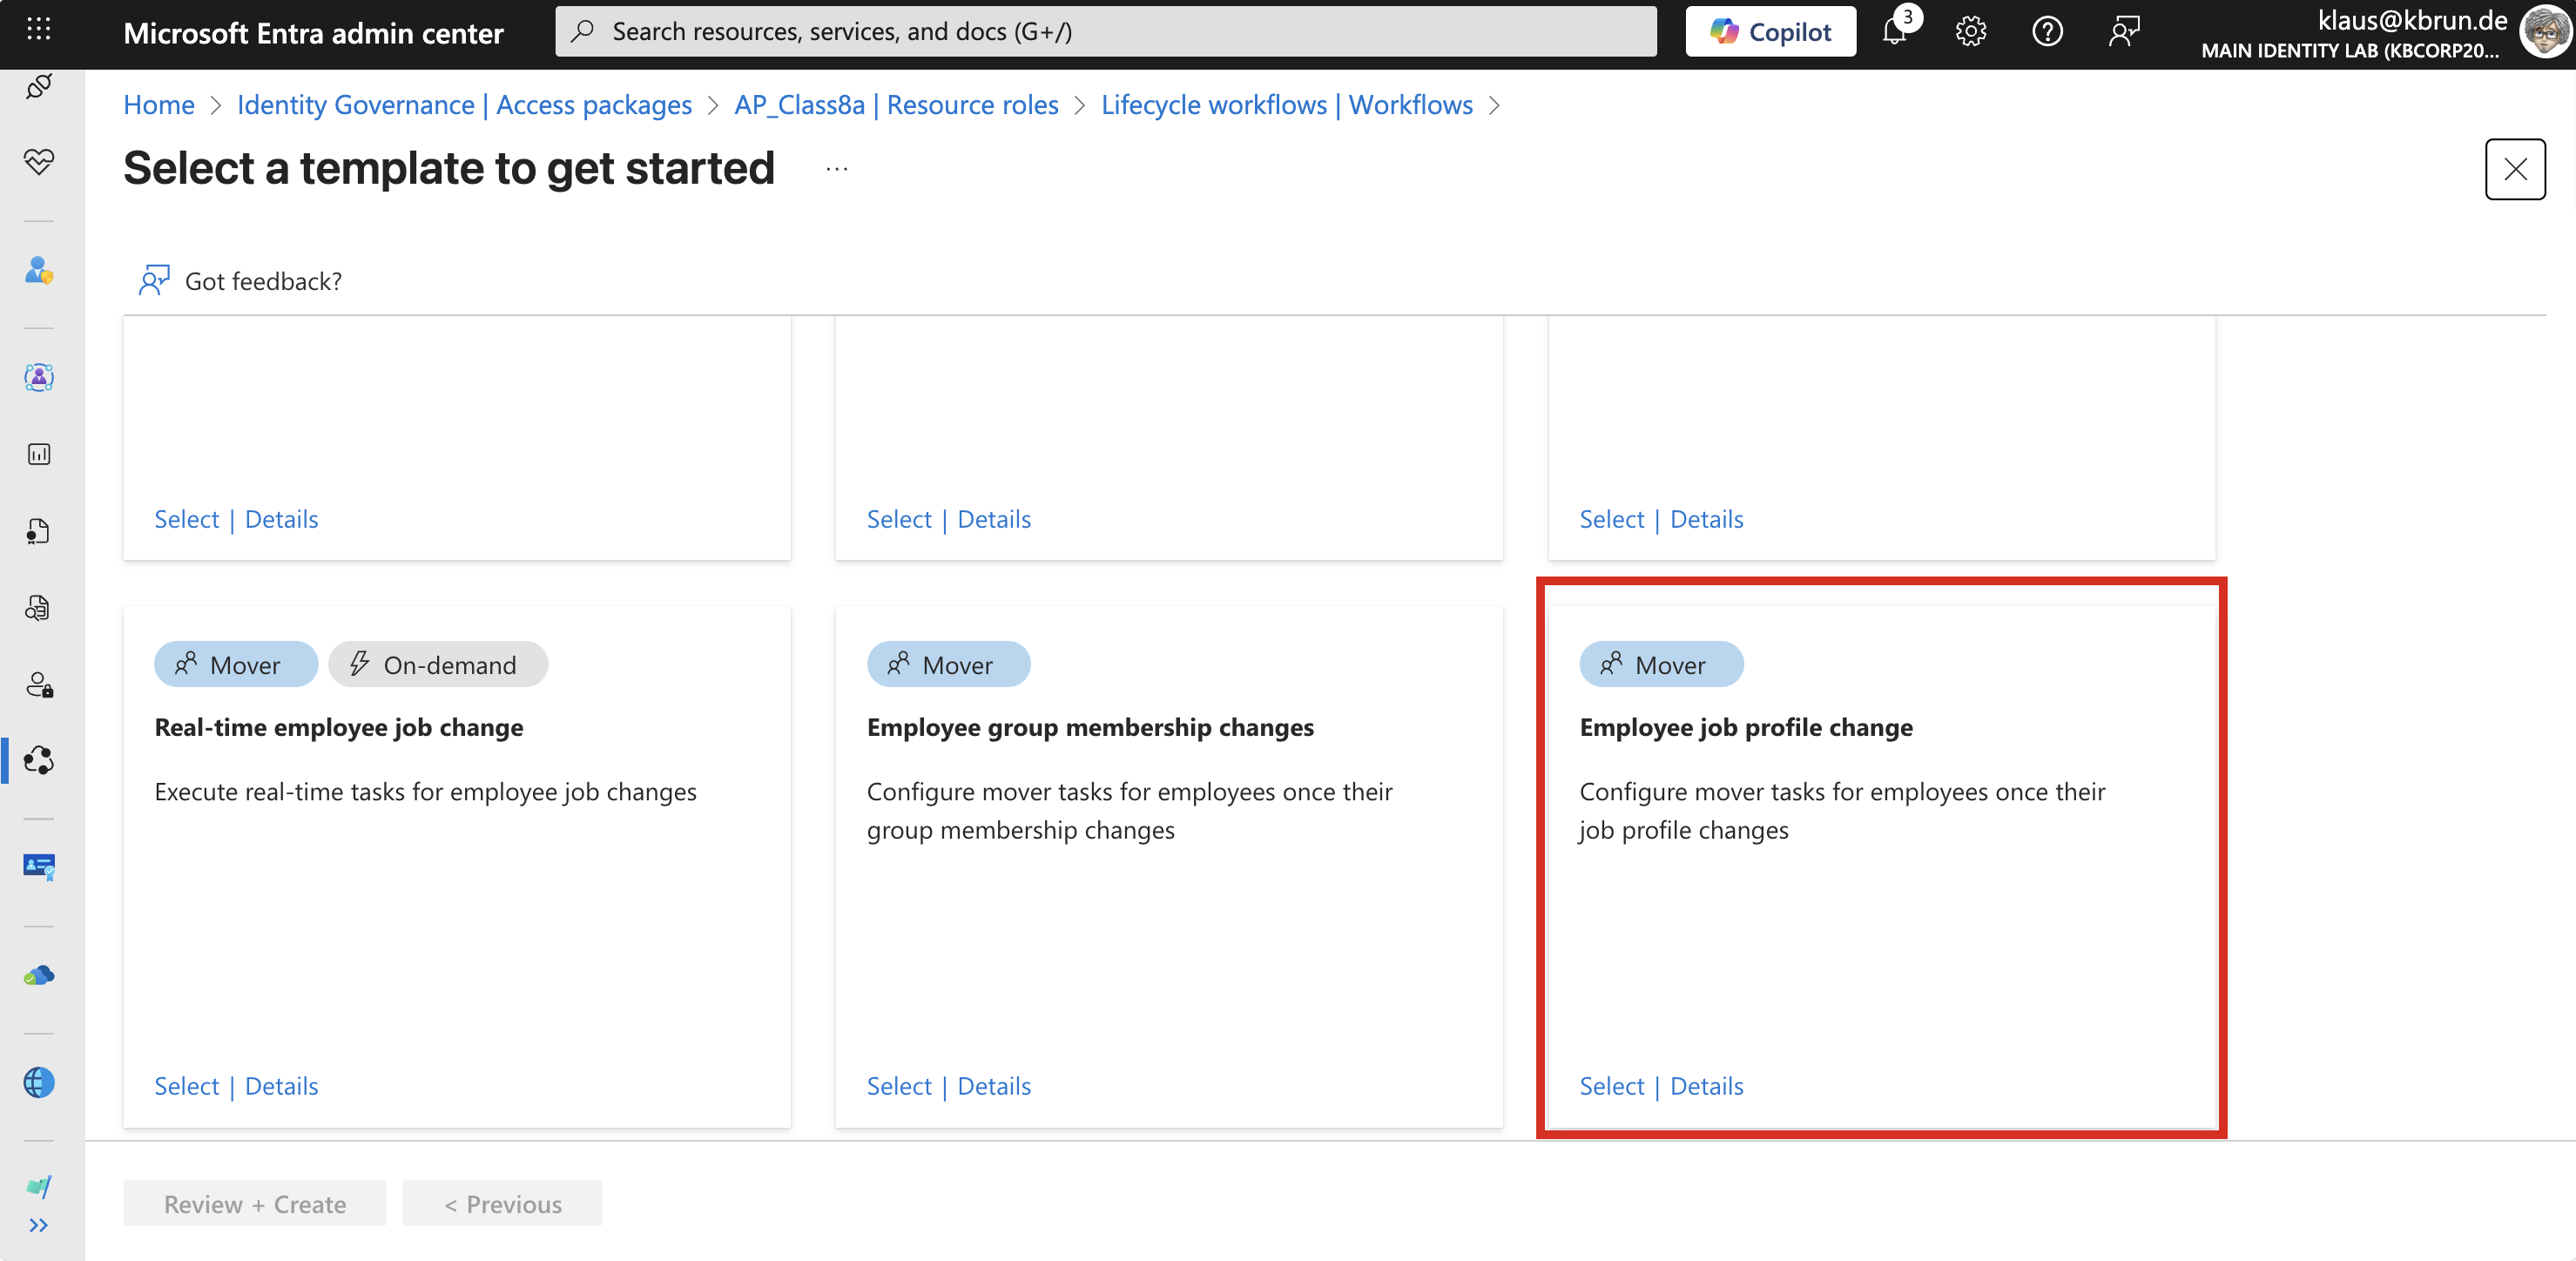 Figure 8: Lifecycle Workflow Template
In this example, we deliberately keep the tasks minimal, as the main goal is to assign the administrative role for an Administrative Unit.
As the first task, we keep the default task that sends an email notification to the manager to inform them that a change has occurred. Next, we add a task to remove all other Access Packages.
In our example, this would include the classes in which the teacher might currently be assigned. In this scenario, there are only two classes, so this would be class 7b.
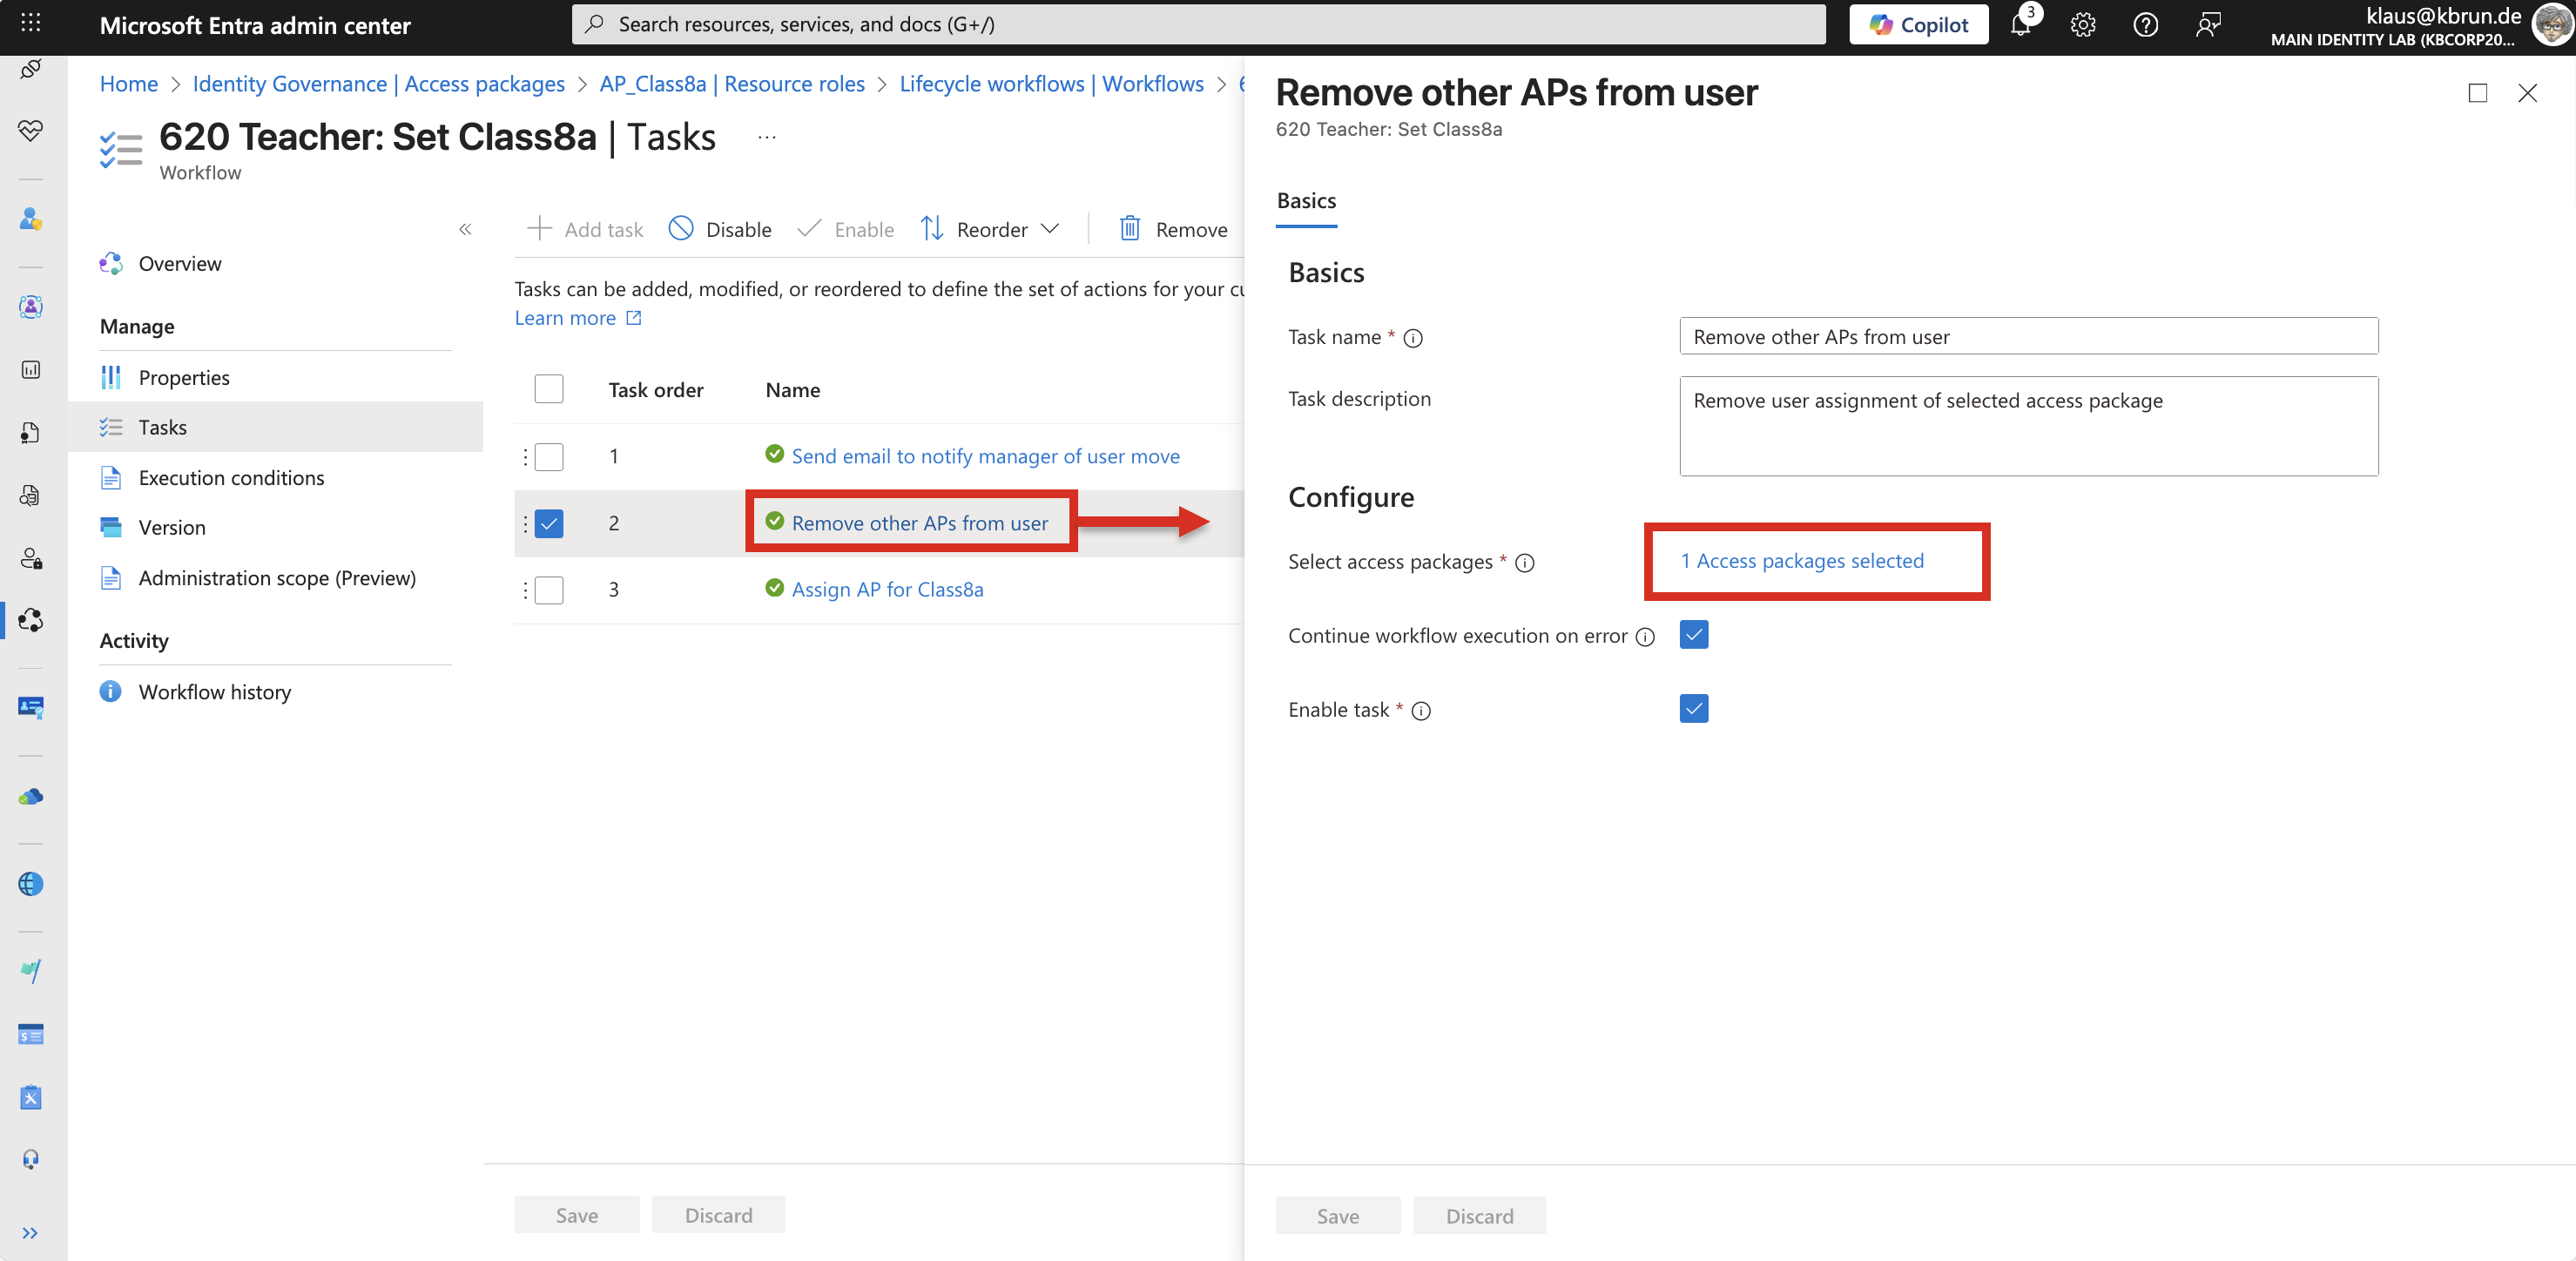 Figure 9: Workflow task to remove existing access packages
Finally, the Access Package for which this workflow was triggered is assigned. In our example, this is the Access Package for class 8a.
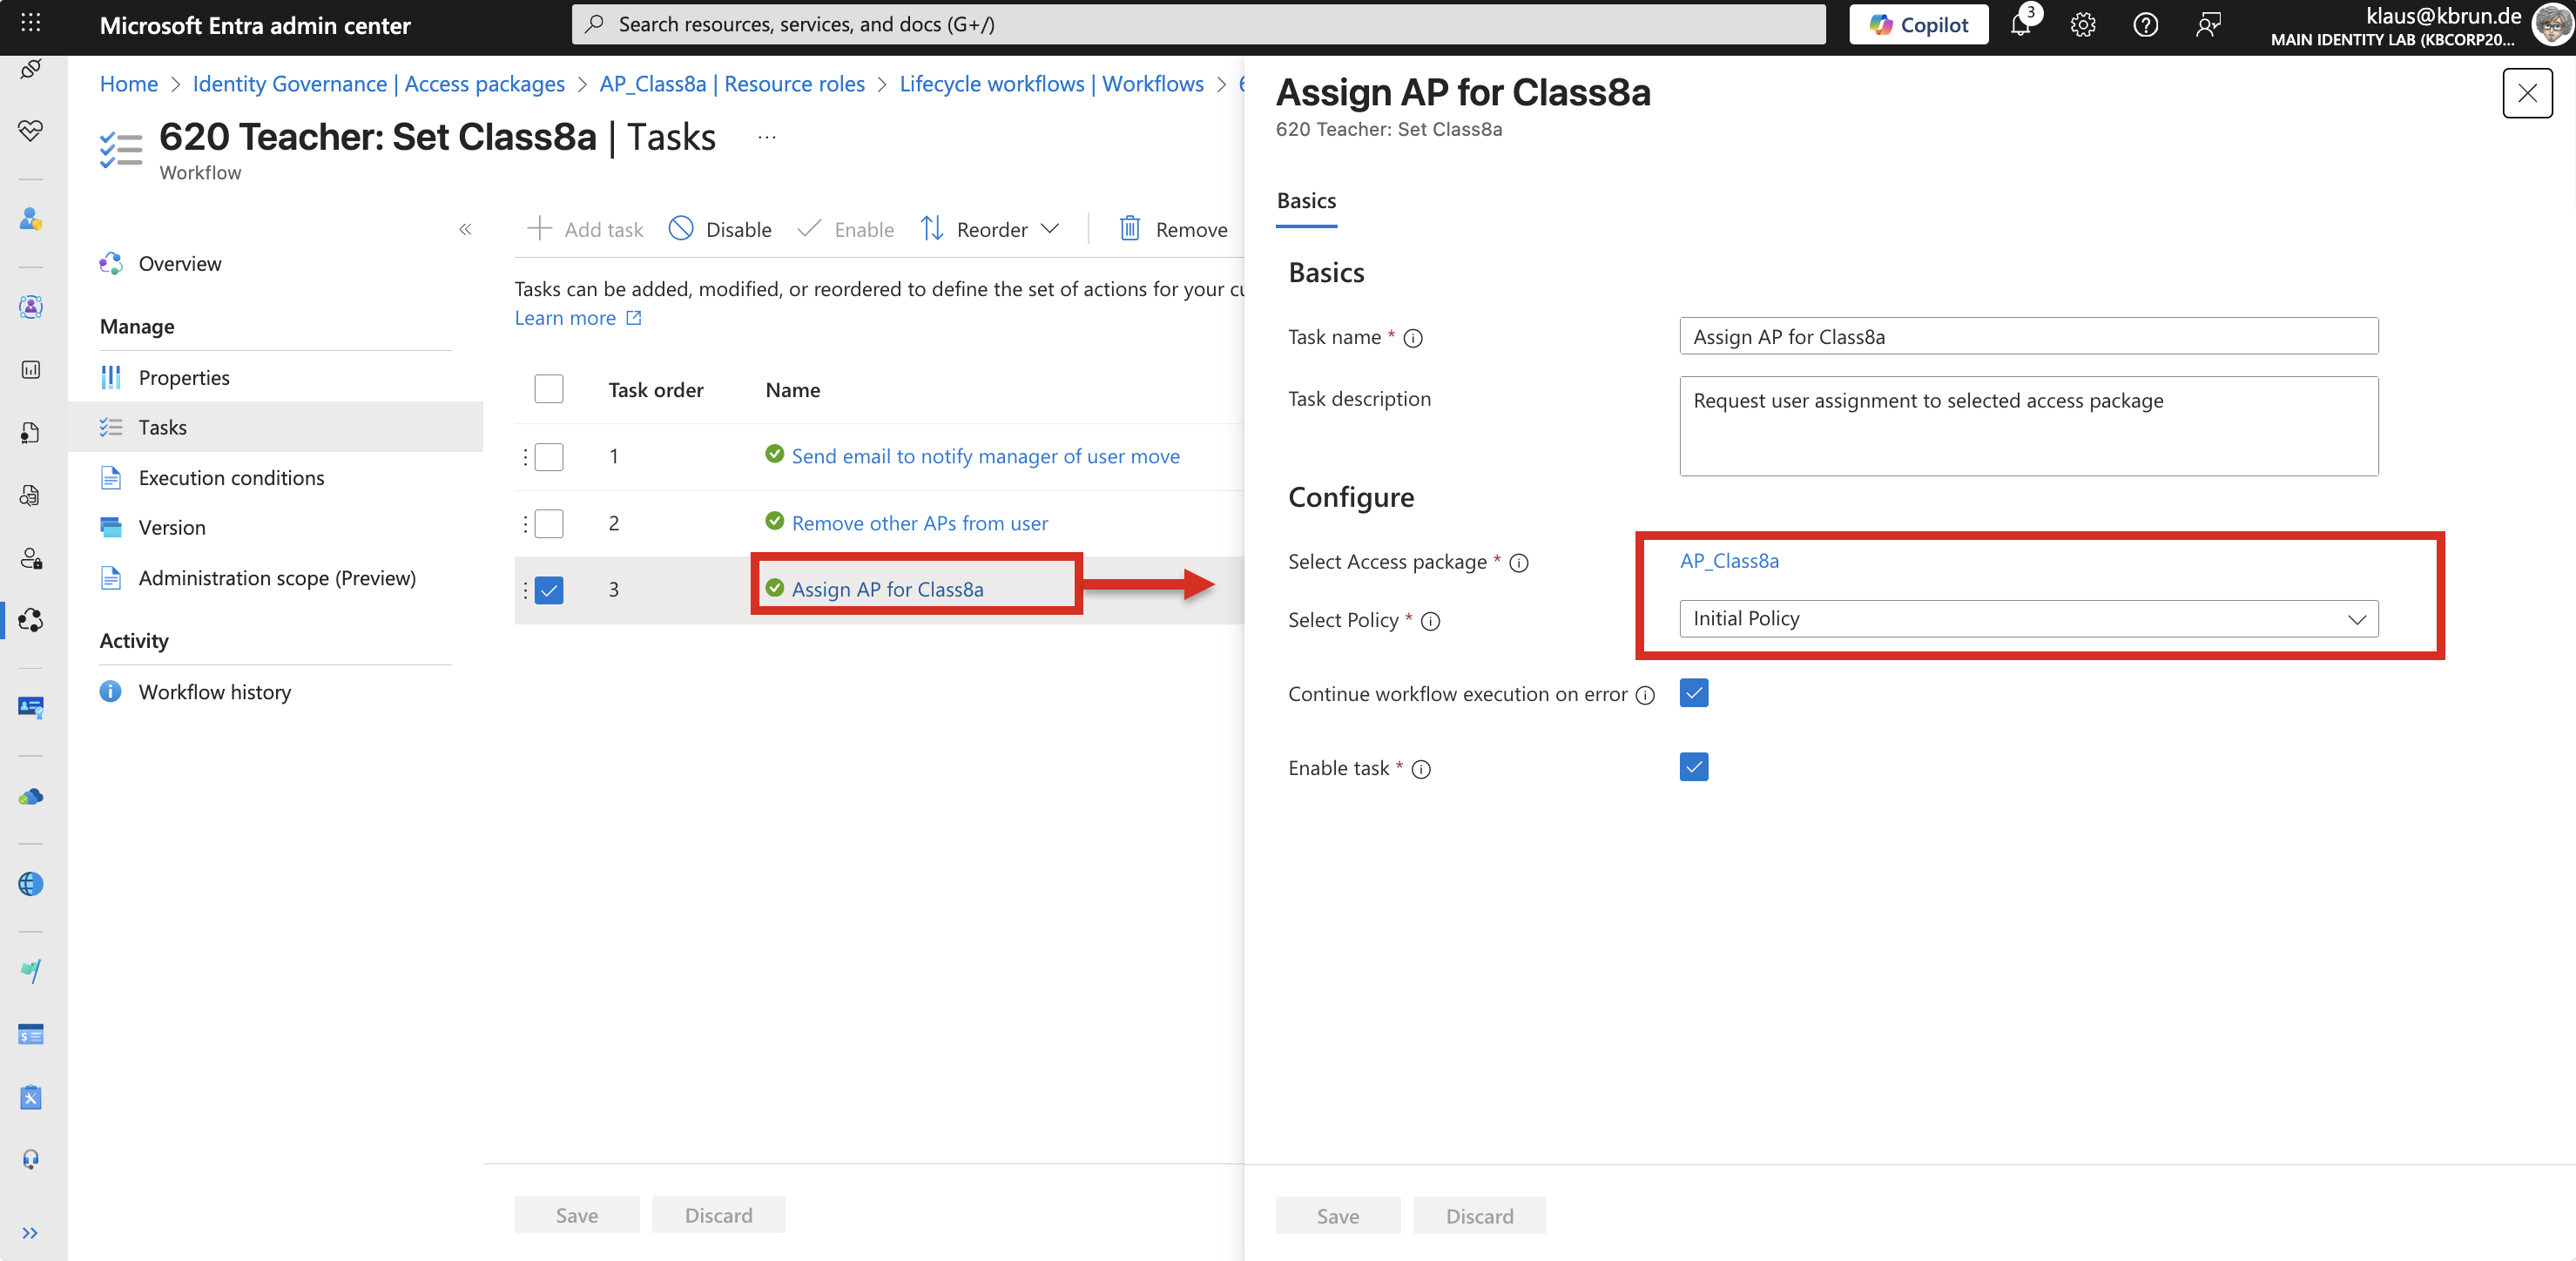 Figure 10:Workflow task that assigns the appropriate access package
That’s all that is required in terms of configuration.
If we now change the department attribute for a user account whose employeeType is set to Teacher, the user automatically receives the Access Package that corresponds to the school class specified in the department attribute of the user object.
It is important that the values in the user attributes are consistent, as string comparisons in Lifecycle Workflows are very strict.
Special care must also be taken with the workflow task settings. For example, when removing existing Access Packages, the teacher’s user account might not actually have the Access Package assigned. Similarly, the user might not have a manager configured for email notifications, or the corresponding attribute might be missing. In such cases, the workflow would fail and stop execution.
This can be avoided by enabling the option “Continue workflow execution on error”. If this option is enabled for all tasks, it ensures that the workflow continues even if individual tasks encounter errors.
Workflow in action
Now let’s look at the user account of Vanessa. At the moment, she is the class teacher for class 7b. From now on, she will take over class 8a and, with that, the administrative tasks for the student accounts in the corresponding Administrative Unit.
We simply update the attribute accordingly. That’s it.
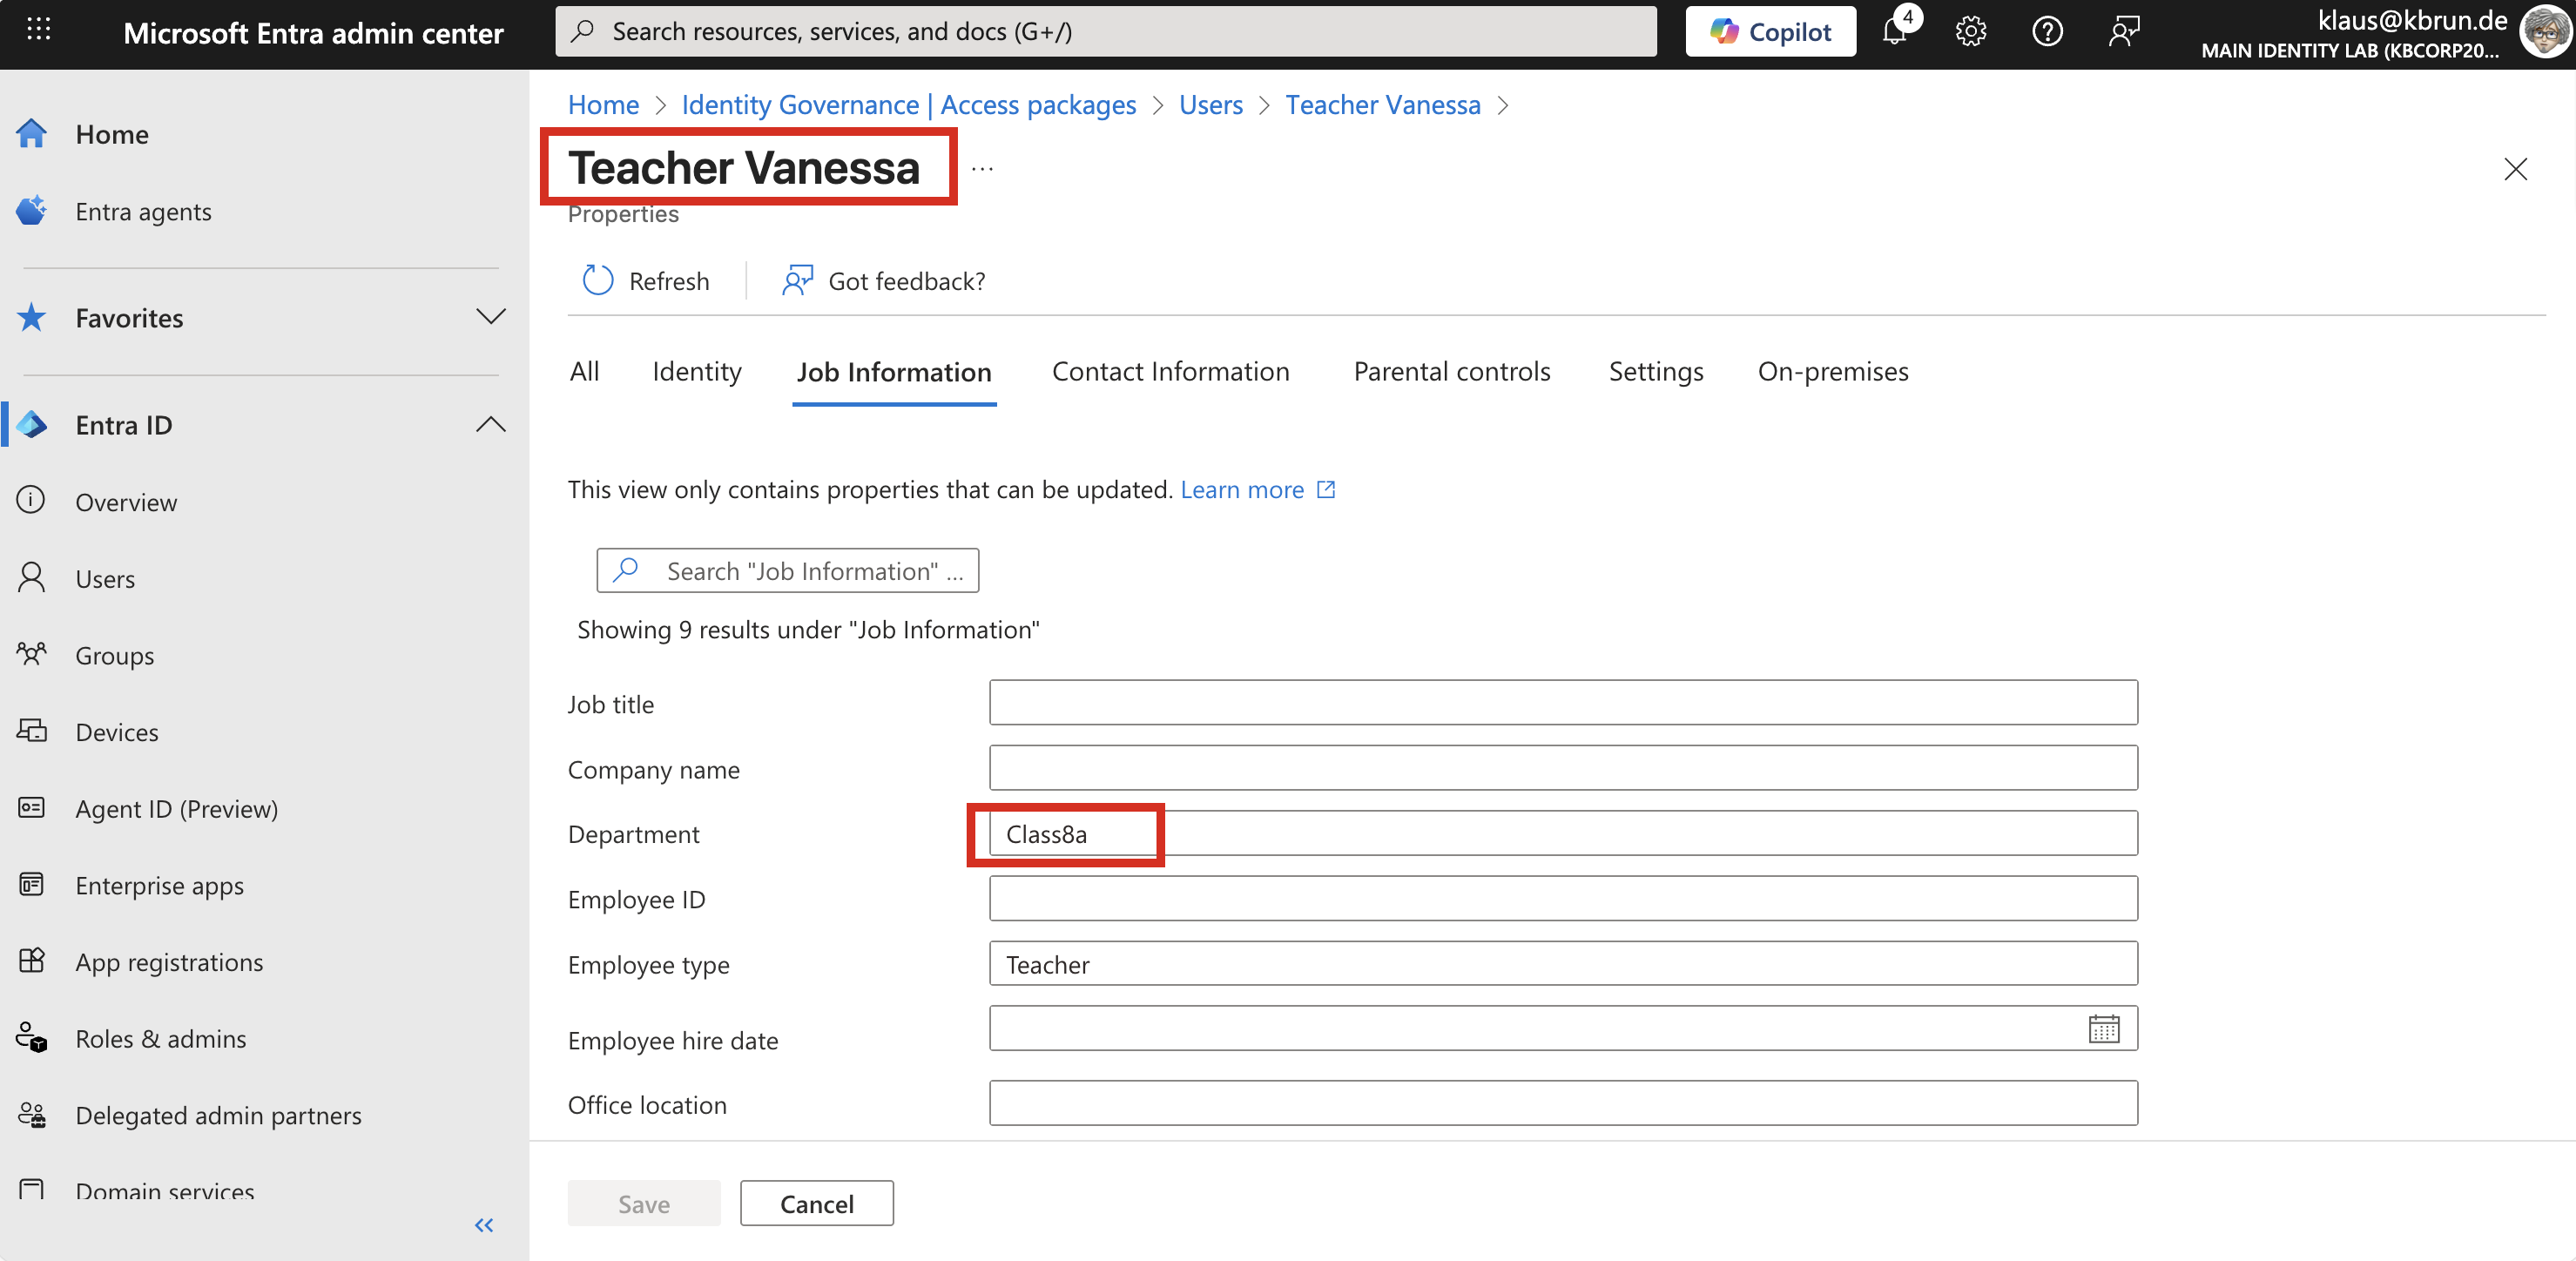 Figure 11:User properties that triggers the Lifecycle Workflow
During the next workflow run, this change is detected and the workflow is triggered. The results of the workflow execution look as follows.
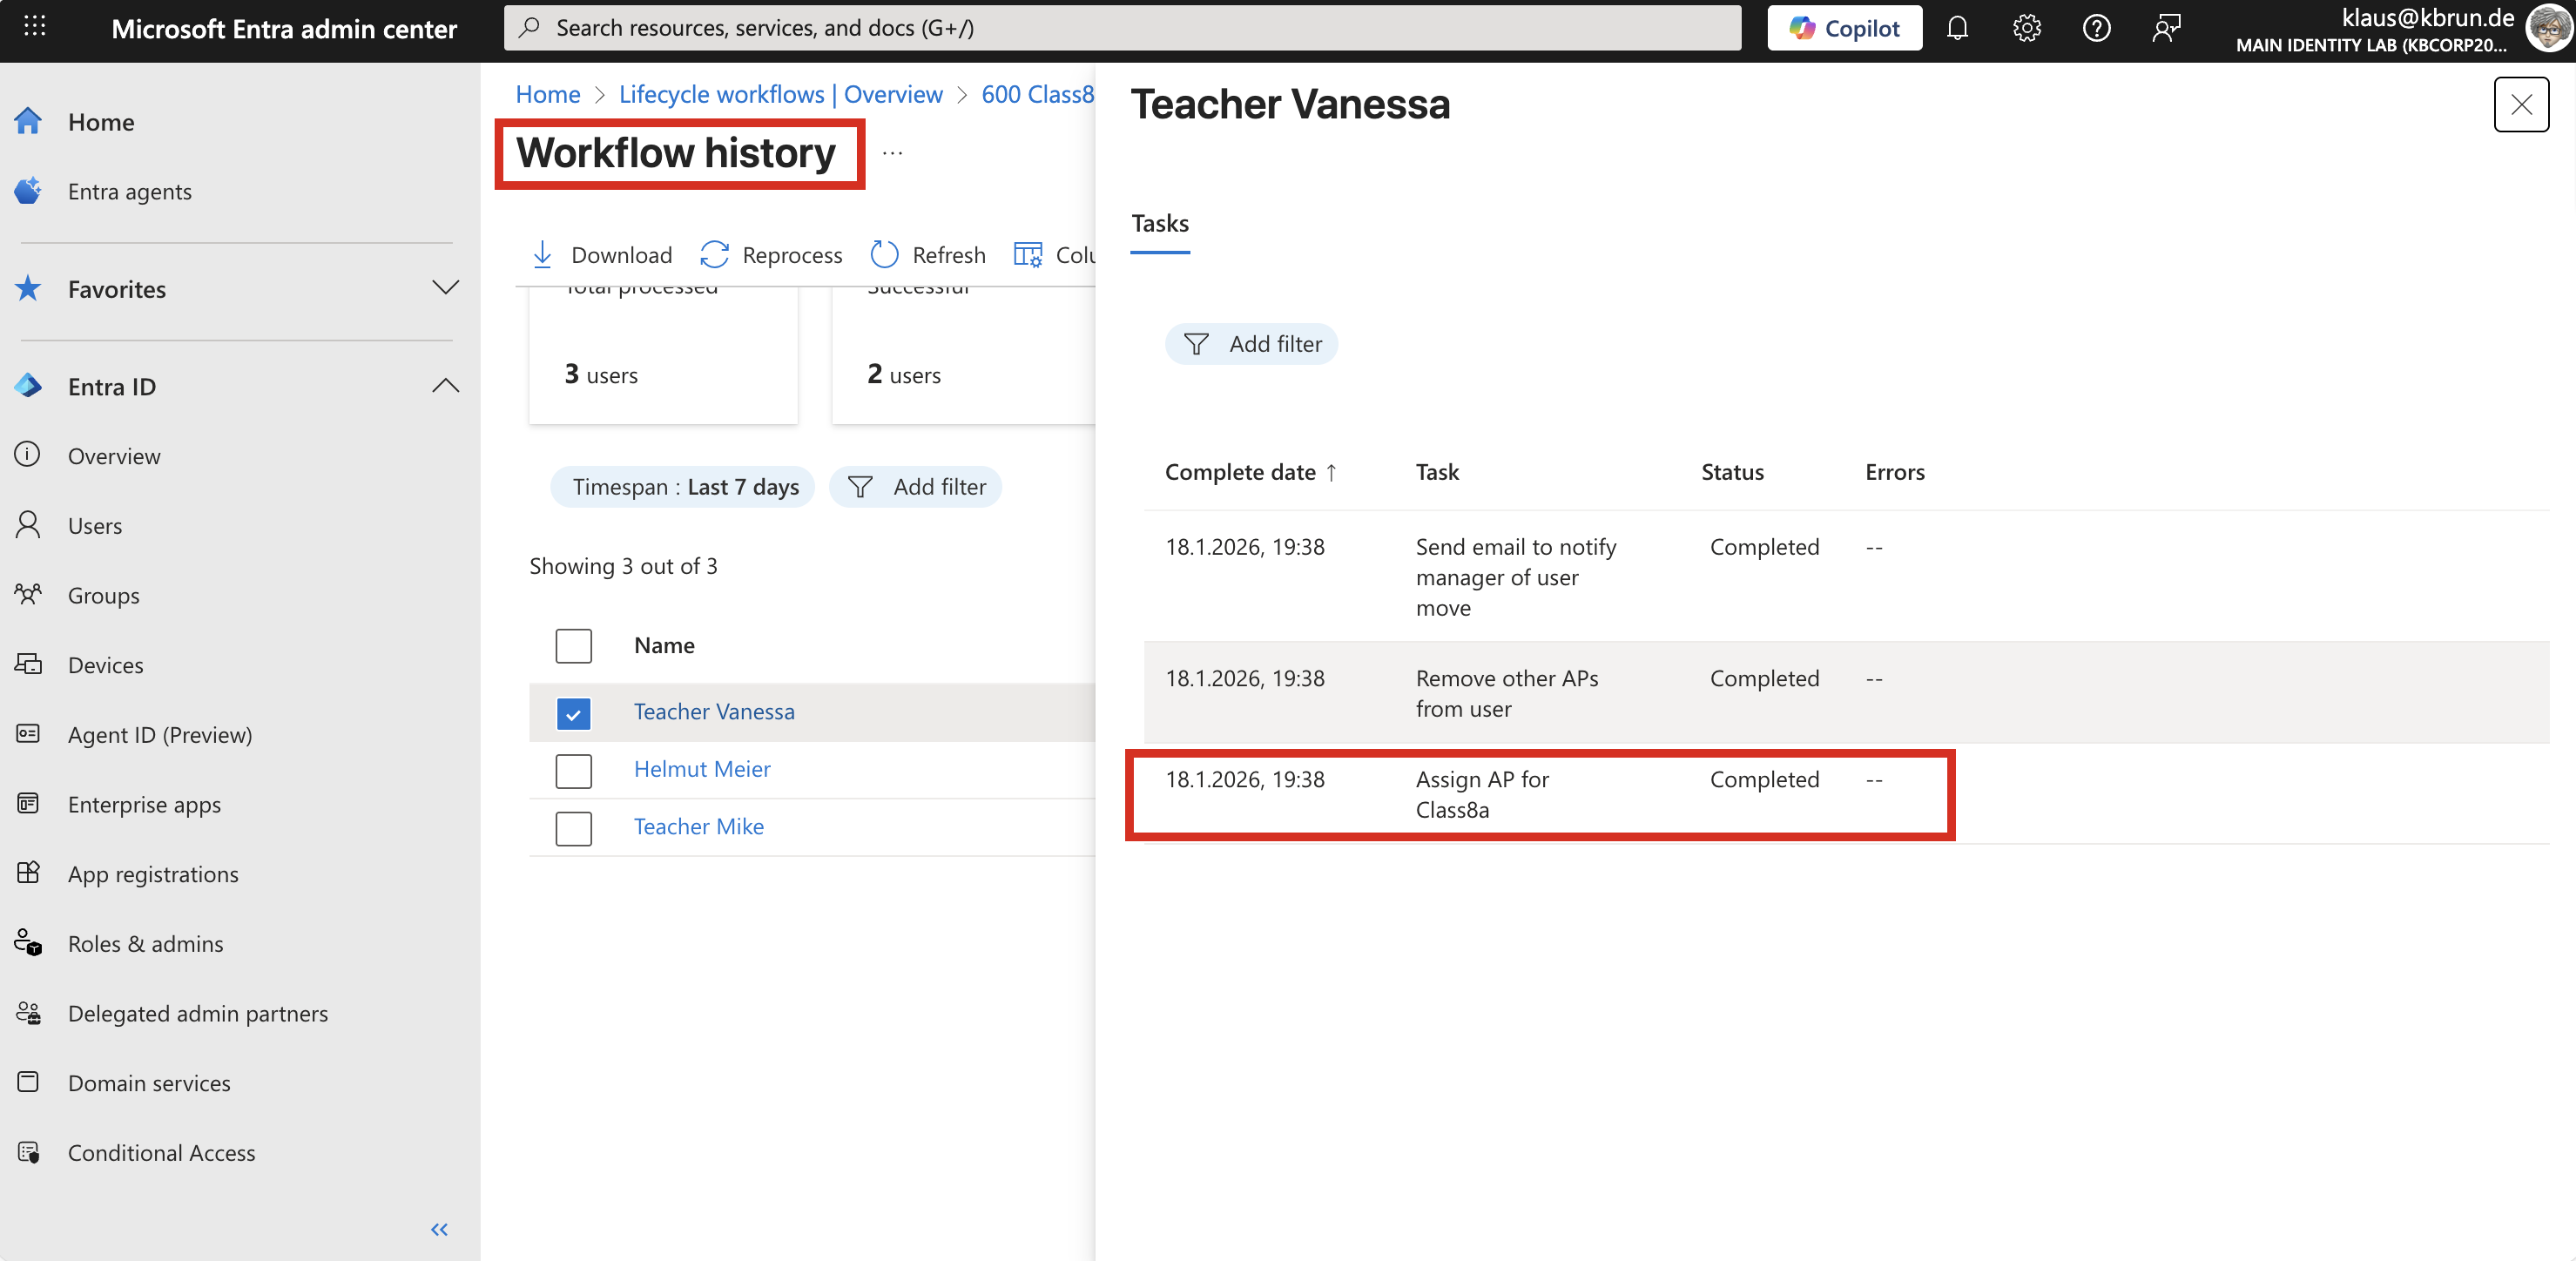 Figure 12:After Workflow run Teacher has assigned access packages
Taking a look at the Access Package shows the new assignments. Vanessa is now included as well.
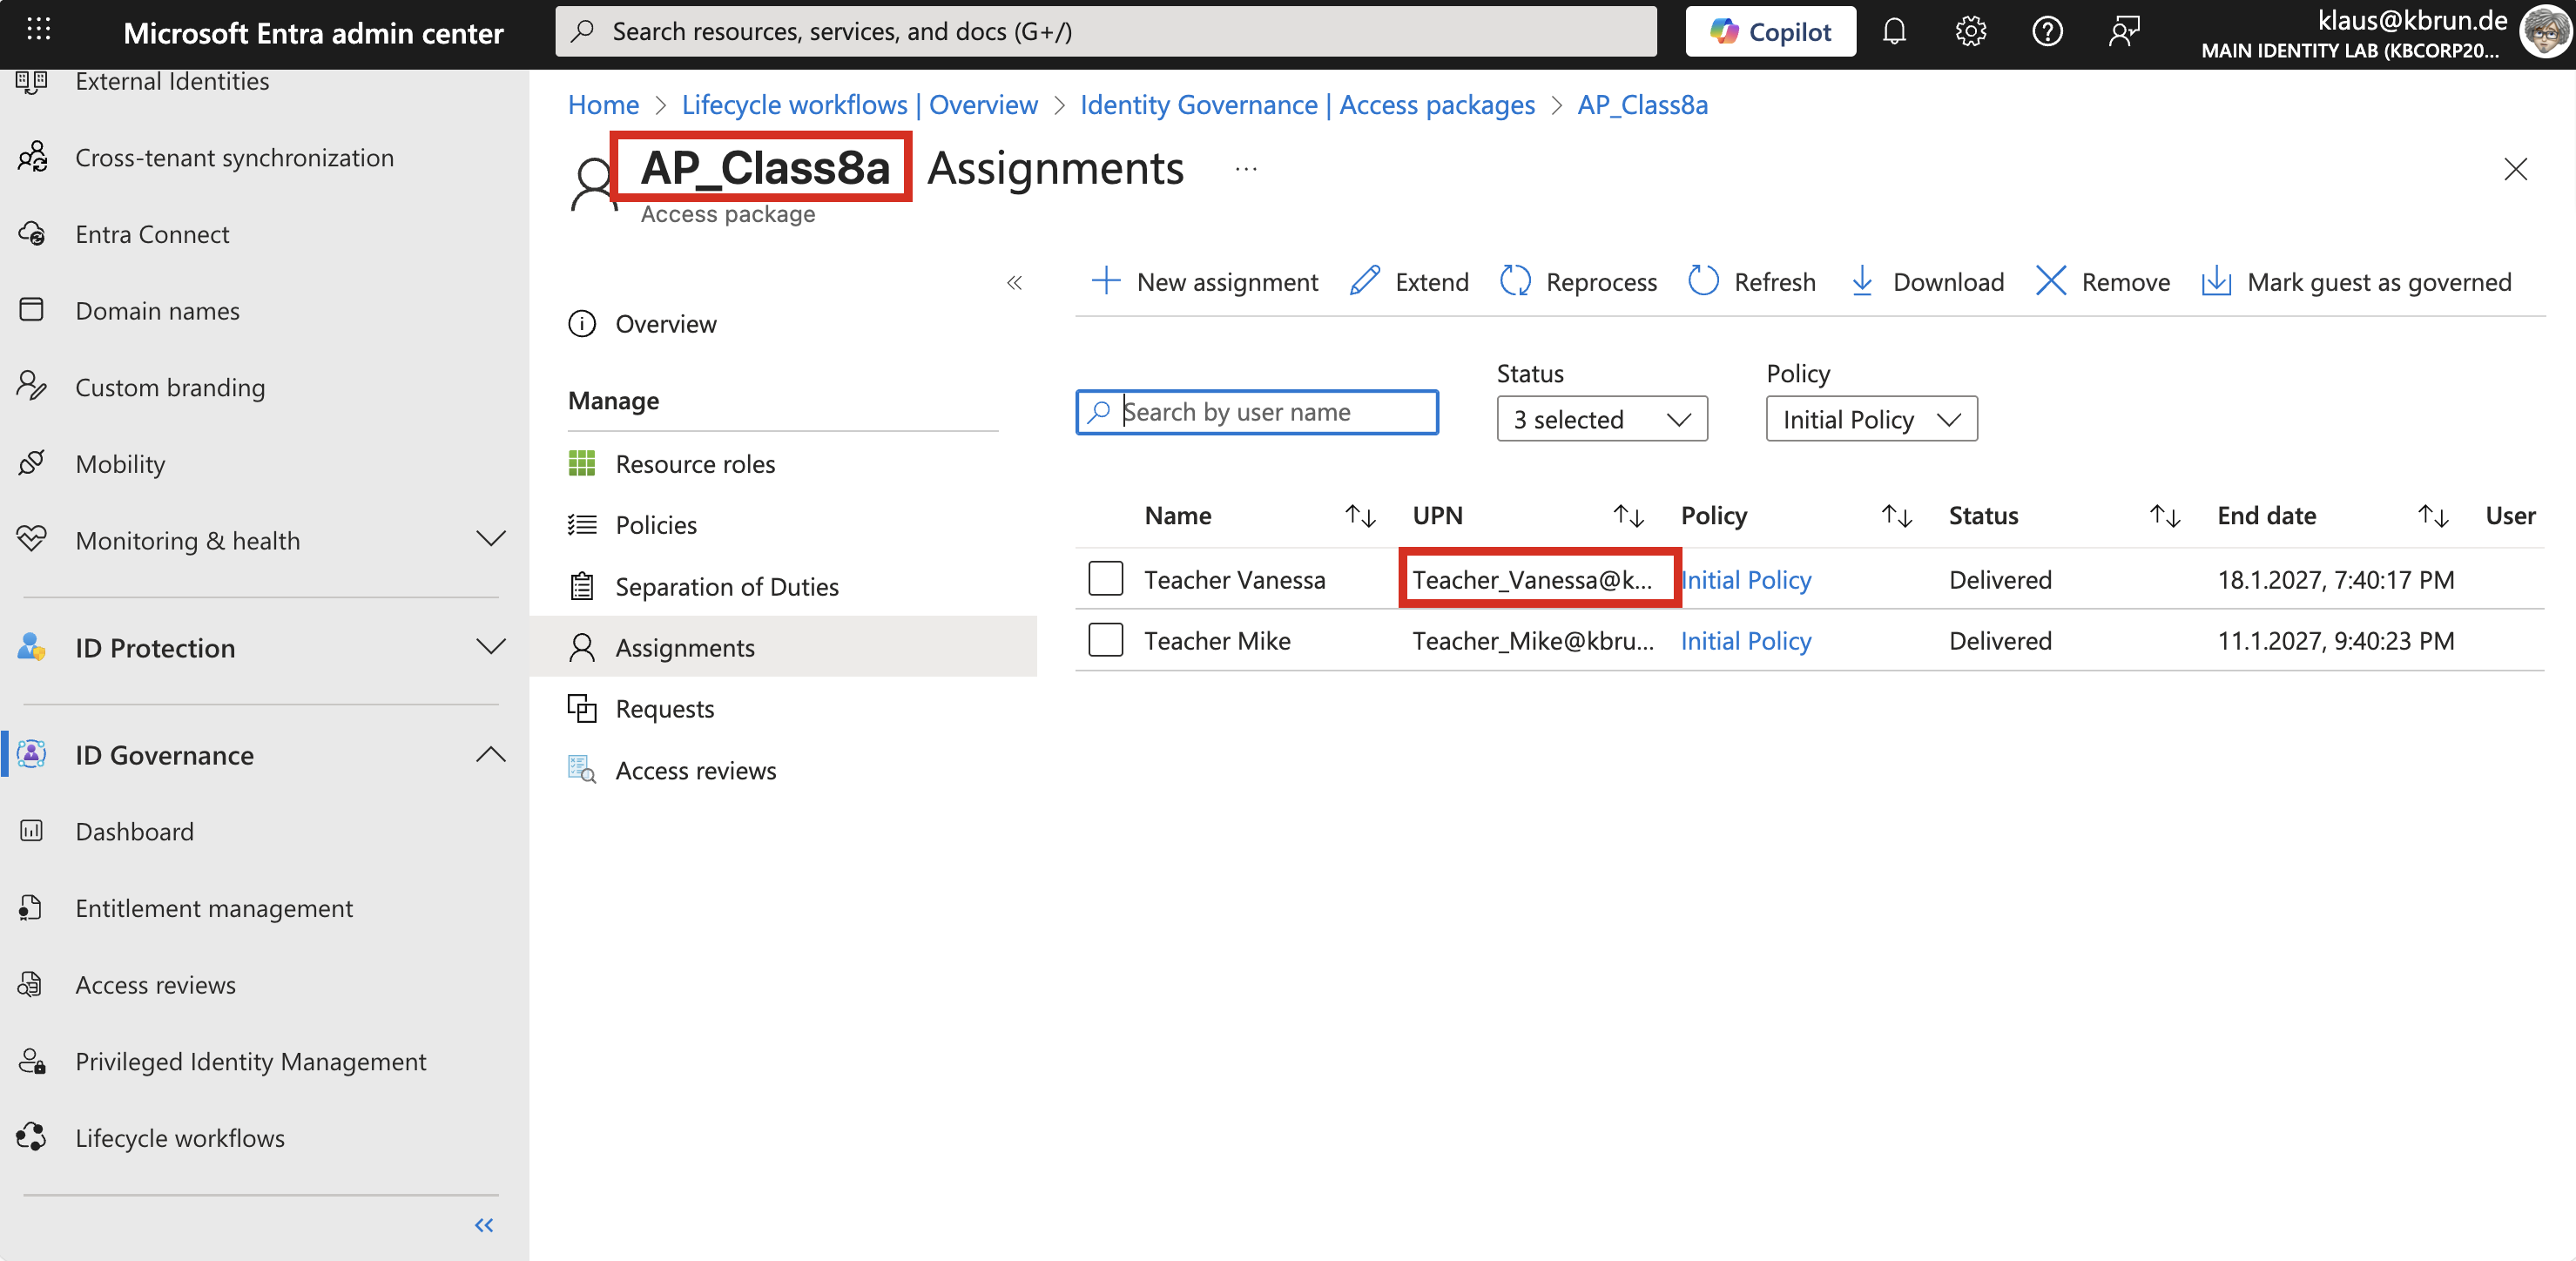 Figure 13:Workflow History shows what happened
Based on the assignments that the respective PIM groups have on the Administrative Units, Vanessa can now manage student accounts in the Administrative Unit for class 8a.
Using the mystaff.microsoft.com portal, Vanessa can see all Administrative Units for which she has administrative permissions.
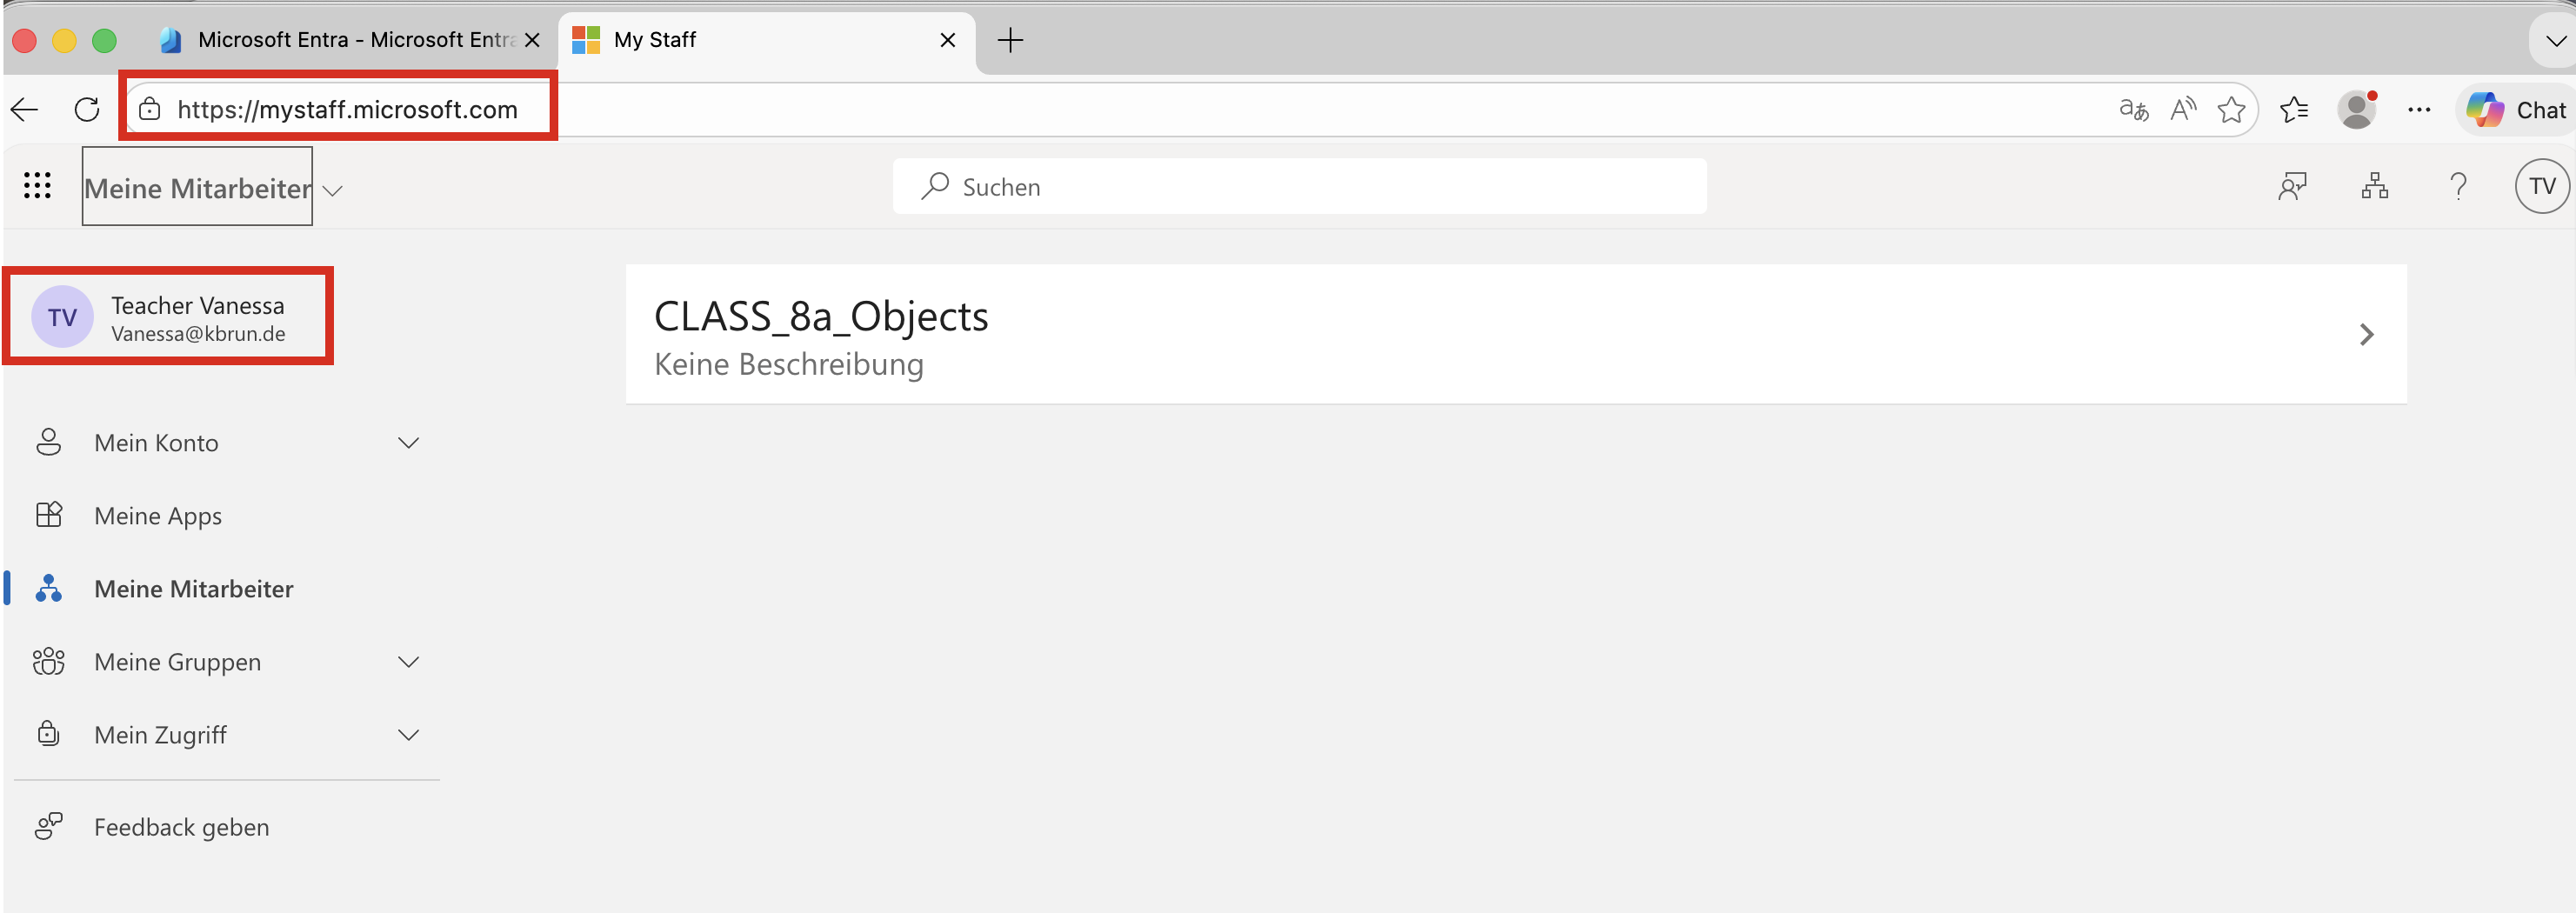 Figure 14:Teacher “mystaff” Web ´Site
The user accounts within those Administrative Units can then be managed accordingly.
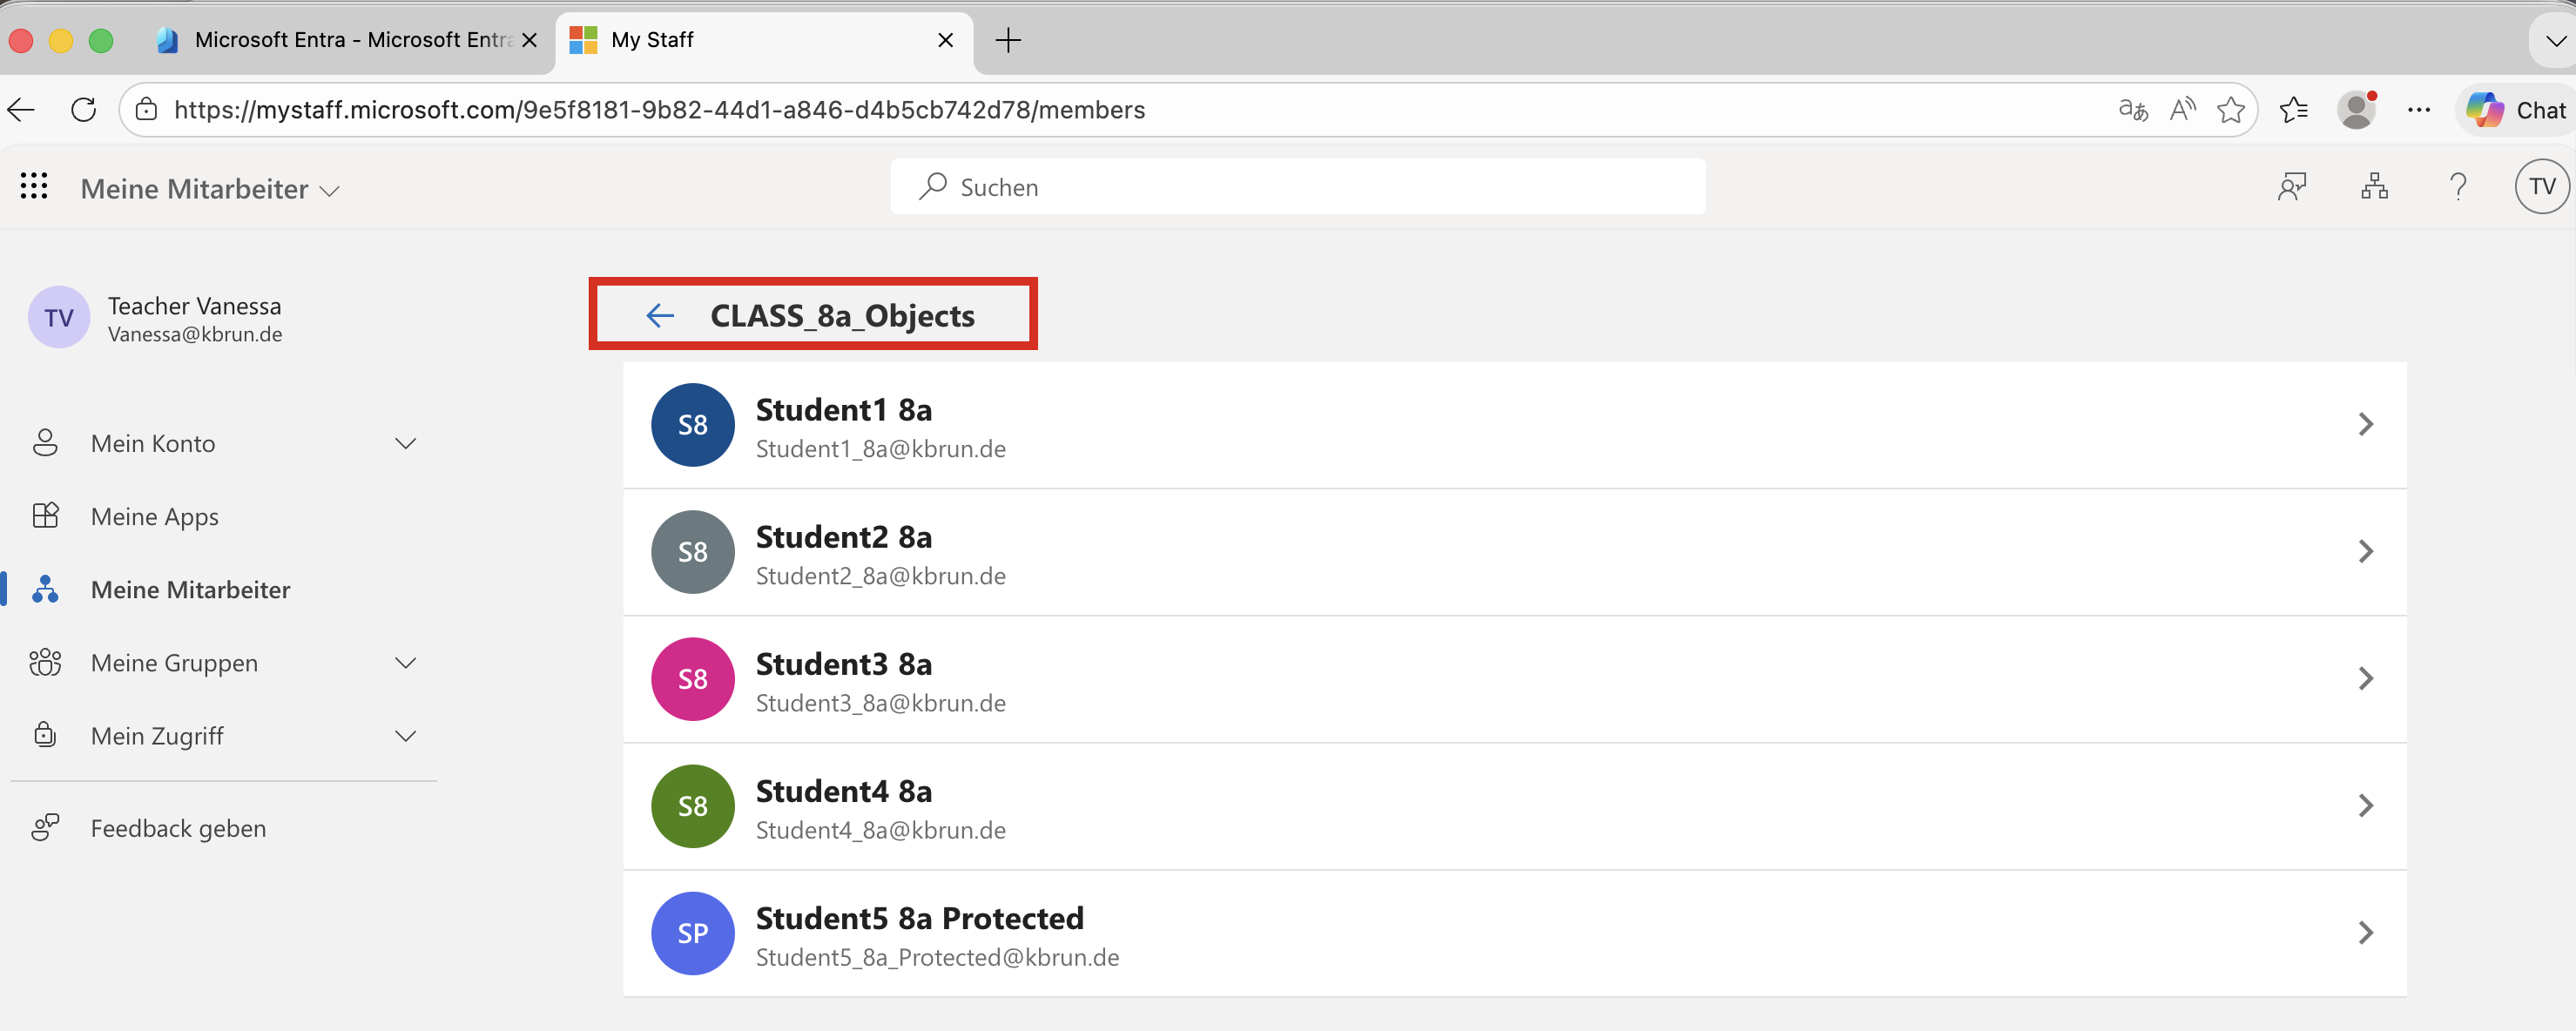 Figure 15:Students from AU for Teacher administration
If she instead uses the Entra Admin Center, she can see all Administrative Units and the users within them based on her administrative role. In the Administrative Unit for class 7b, the options to modify user accounts are disabled.
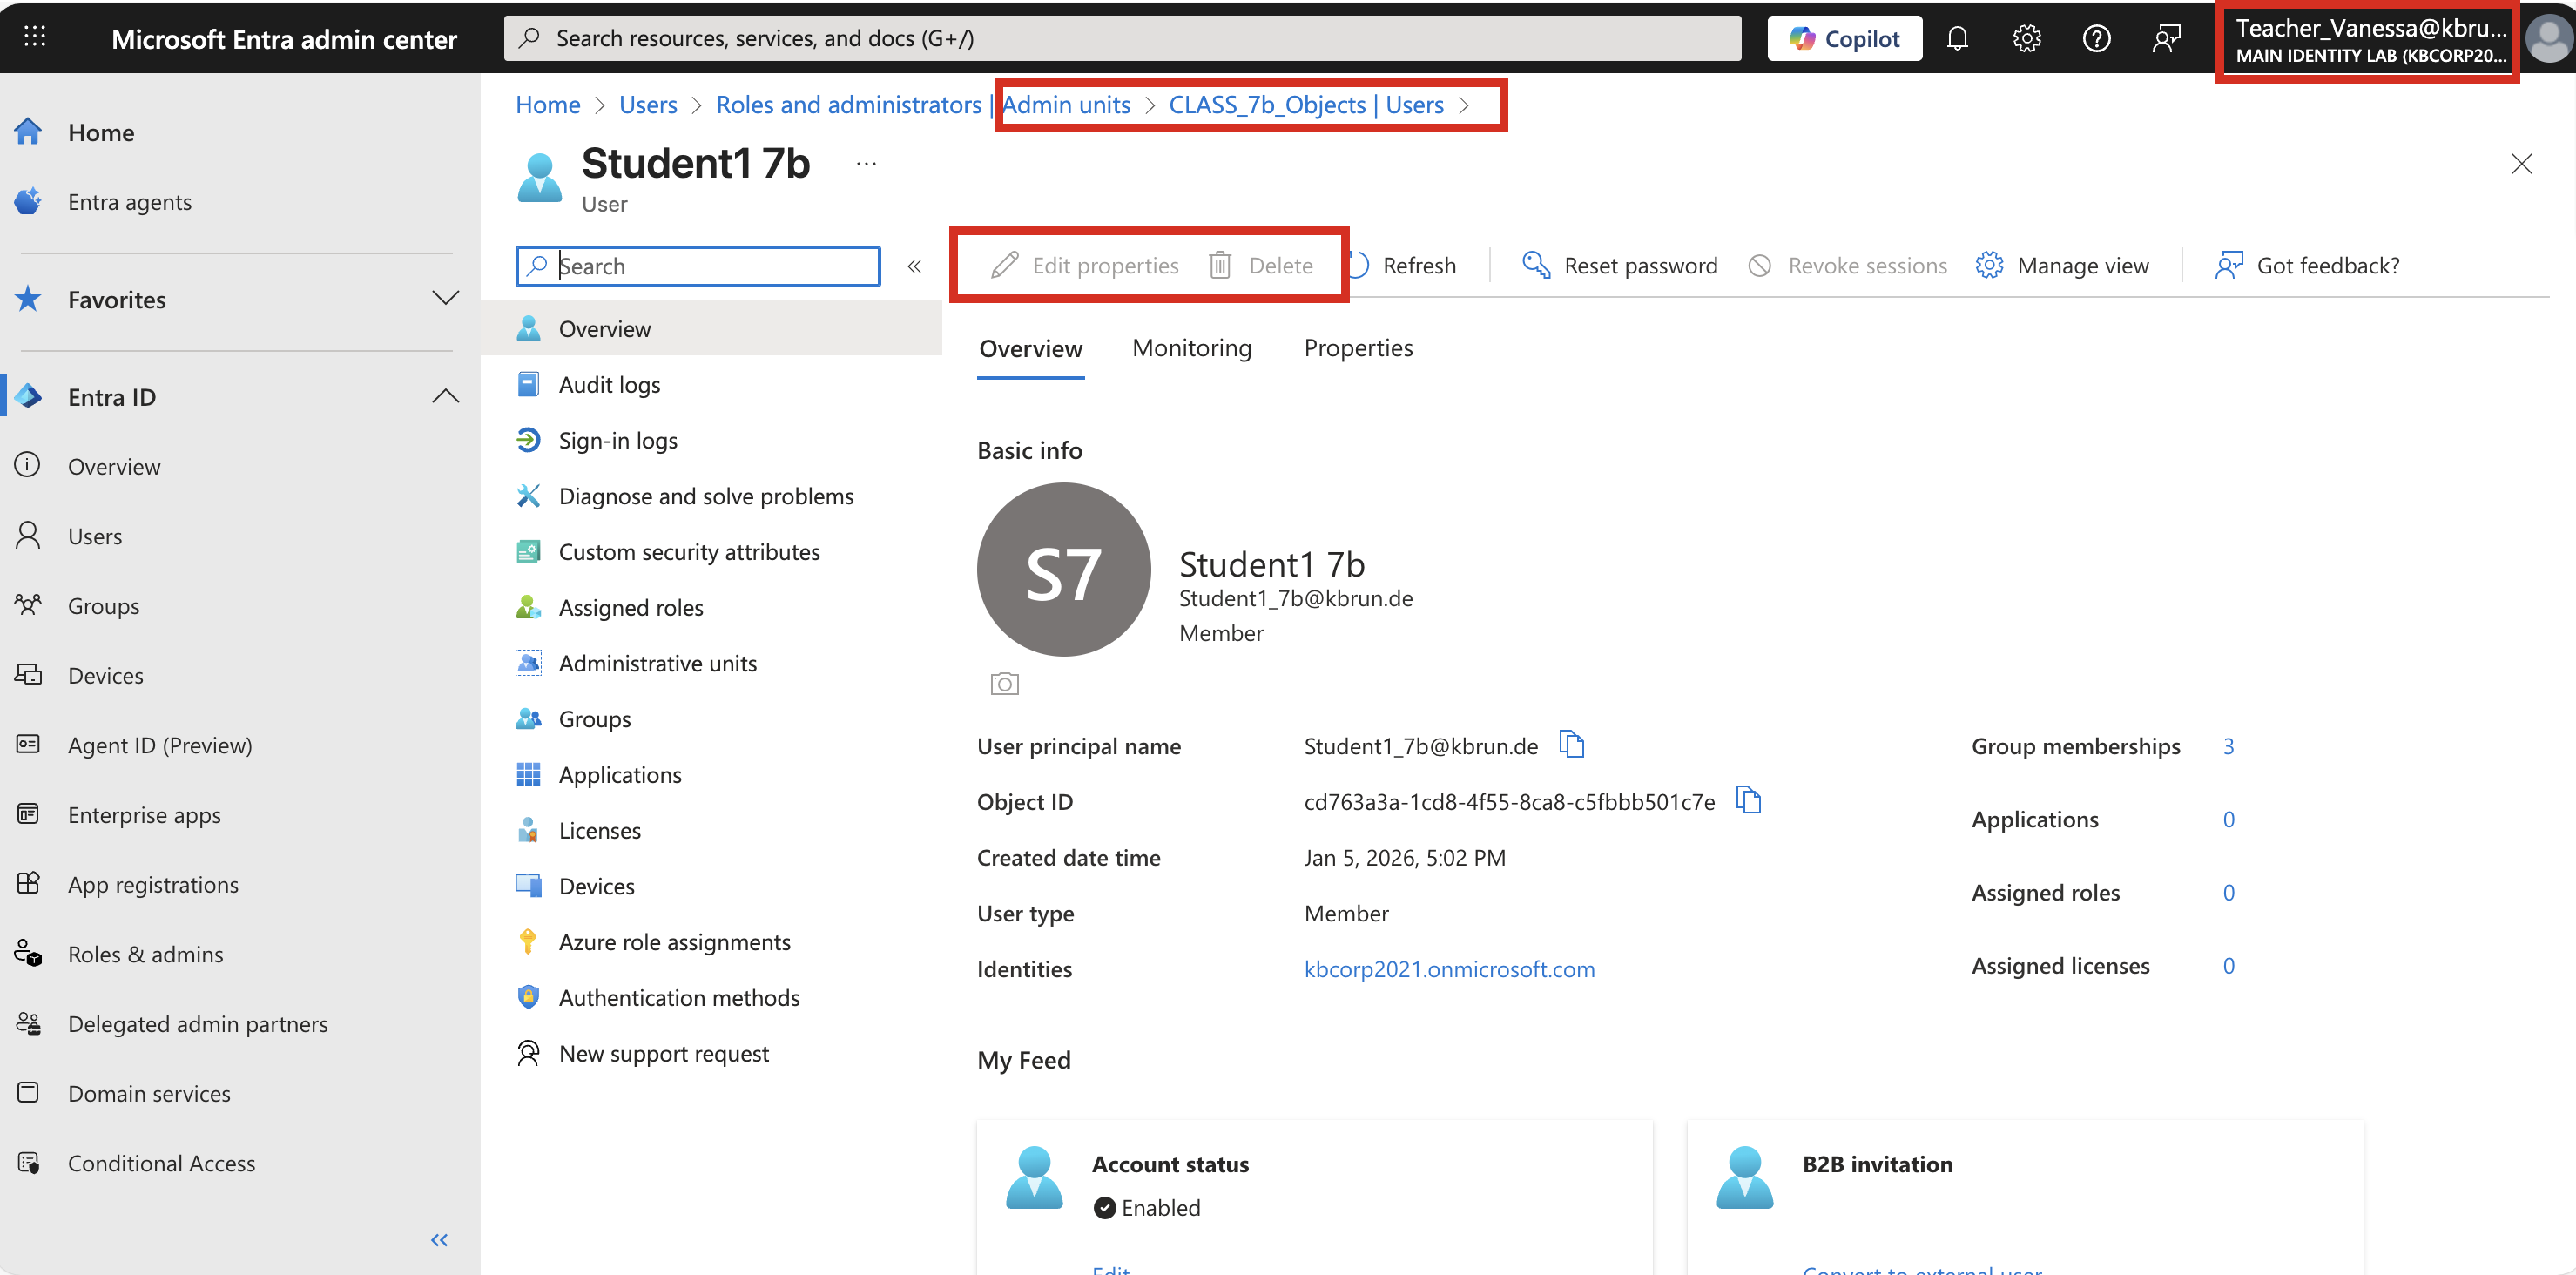 Figure 16:Student outside Teacher scope cannot be edited
In contrast, editing is possible in the Administrative Unit for class 8a.
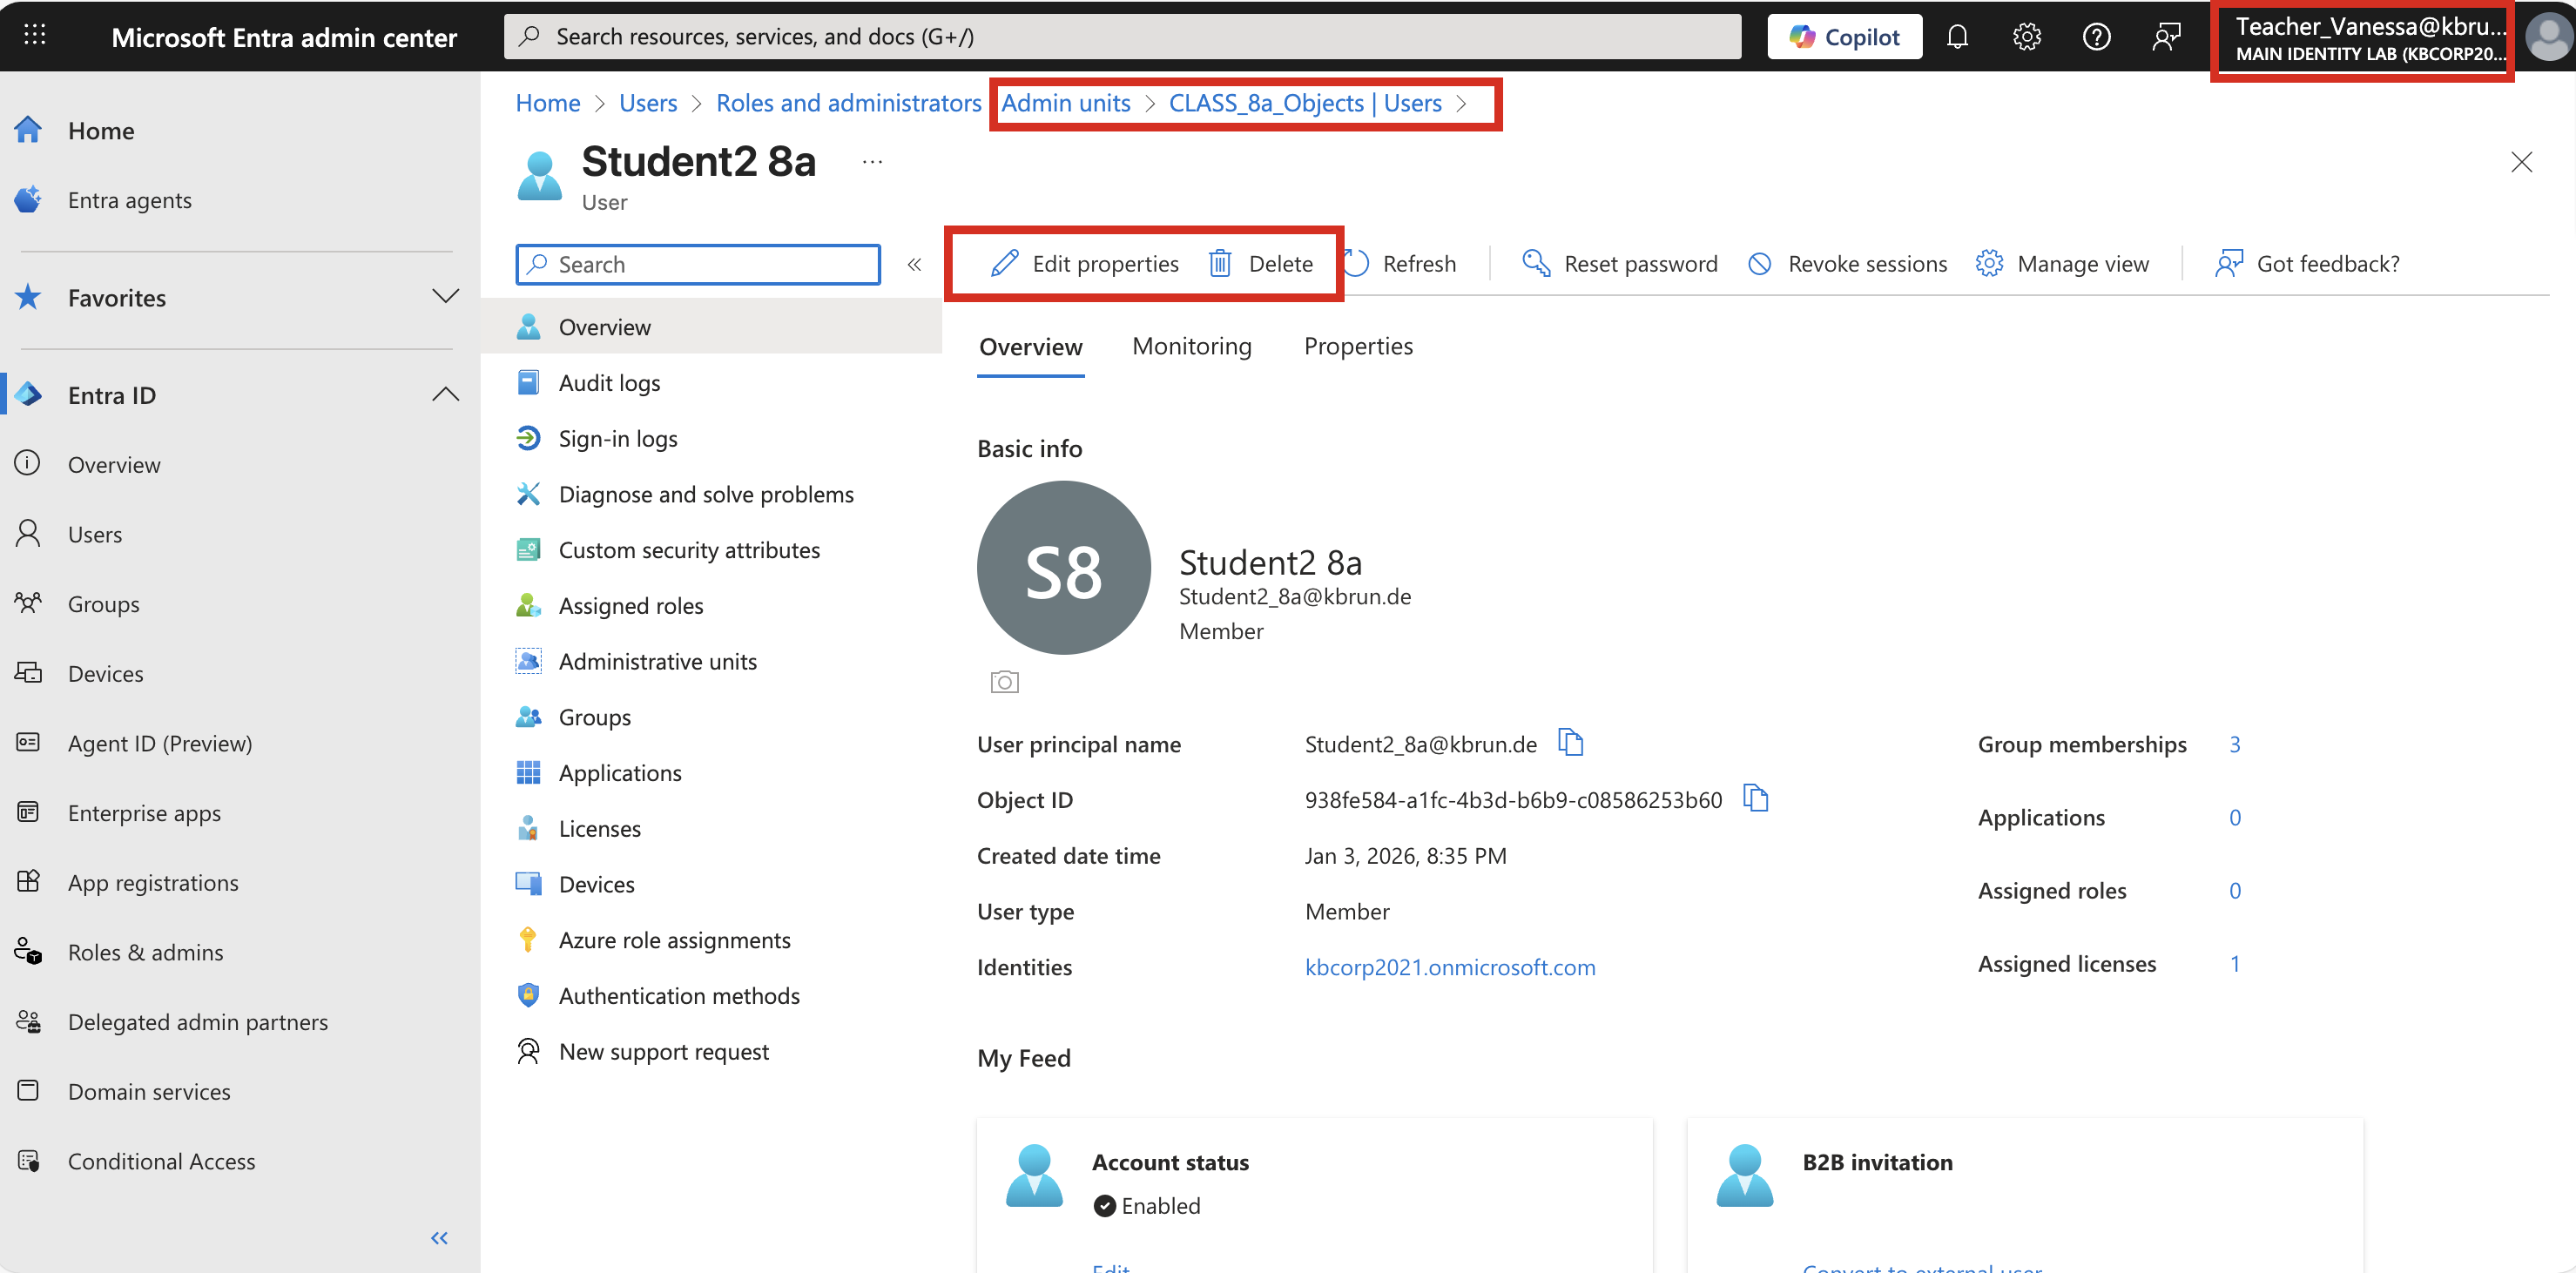 Figure 17:Users in the teacher’s scope can be edited
Further ideas
This example is intentionally kept simple, but it can easily be extended depending on the use case. For example, if a teacher is responsible for multiple school classes, the scope can be adjusted accordingly. In this case, the “eq” operator in the Lifecycle Workflow would no longer be sufficient. Instead, the “in” operator can be used to match a class from a list of classes.
Summary
It is certainly a good thing that administrative roles are not automatically assigned and removed out of the box. However, there are always special cases where this kind of automation makes sense.
The approach described here provides one way to handle such scenarios. Access Packages and Lifecycle Workflows are governance features and therefore require the appropriate licensing. Without these licenses, a Logic App could be used as an alternative.
The PIM-related aspects around Administrative Units remain the same in both cases. The only difference is how the Access Package is assigned to the teachers, which in this solution is handled using governance functionality which is very easy to implement
Deutsche Version
Grundlegende Einführung
Administrative Units (AUs) sind eine leistungsstarke Funktion in Microsoft Entra ID. Sie ermöglichen es, Benutzerkonten, Gruppen oder Geräte zu gruppieren und diese gemeinsam anhand spezifischer administrativer Anforderungen zu verwalten.
AUs werden häufig mit Organizational Units (OUs) aus den Active Directory Domain Services verwechselt, haben jedoch – abgesehen von der Namensähnlichkeit – nichts gemeinsam. Administrative Units sind ausschließlich für die Delegation konzipiert: Sie ermöglichen es, administrative Berechtigungen so zu begrenzen, dass Administratoren nur die Objekte innerhalb einer bestimmten AU verwalten können.
Figure 1: Administrative Units
Einer der leistungsstärksten Aspekte von Administrative Units ist die Unterstützung dynamischer Mitgliedschaftsregeln. Objekte können automatisch einer AU zugeordnet werden, basierend auf bestimmten Attributen. Gängige Beispiele hierfür sind Attribute wie extensionAttributes, das Department Attribut oder andere Eigenschaften. Durch den Einsatz dynamischer Mitgliedschaftsregeln lassen sich Benutzerkonten automatisch den passenden Administrative Units zuordnen, ganz ohne manuellen Eingriff.
Figure 2: Administrative Unit - dynamic membership rule
Objekte in Microsoft Entra ID können gleichzeitig Mitglied in mehreren Administrative Units sein, was die Flexibilität bei der Delegation weiter erhöht. Ein typisches Beispiel hierfür ist der Einsatz von AUs für Projekte. Ist ein Mitarbeiter in mehreren Projekten tätig, kann sein Benutzerkonto Mitglied in allen entsprechenden Administrative Units sein.
➜ Wichtig
Ein wichtiger Aspekt bei der Delegierung von Berechtigungen mit Administrative Units ist die Tatsache, dass administrative Rollen ausschließlich manuell zugewiesen werden können und nicht dynamisch, wie es zuvor für die Mitglieder in der AU beschrieben wurde.
Meiner Meinung nach ist das auch gut so. Administrative Berechtigungen automatisiert über Hintergrundprozesse zu vergeben, halte ich für kritisch. Aus gutem Grund erlaubt Microsoft daher auch nicht, PIM-Gruppen dynamisch zu befüllen.
Dennoch gibt es Szenarien, in denen eine solche Automatisierung sinnvoll sein kann und bei denen das damit verbundene Risiko deutlich geringer ist.
Ein gutes Beispiel hierfür ist der Bildungsbereich. Stellen wir uns eine Schule mit Klassenlehrern vor, die Passwörter zurücksetzen oder Eigenschaften von Benutzerkonten ändern dürfen – jedoch ausschließlich für die Schüler ihrer eigenen Klasse. Ähnliche Beispiele gibt es viele, auch im industriellen Umfeld. Bleiben wir jedoch bei dem Schulbeispiel, da hier eine besondere Herausforderung besteht.
Die Herausforderung
Einmal im Jahr, zum Ende des Schuljahres, muss der administrative Geltungsbereich für alle Klassenlehrer in größerem Umfang angepasst werden, um ihre neuen Klassen abzubilden. Das bedeutet, dass die administrativen Zuweisungen zu den jeweiligen Administrative Units entsprechend geändert werden müssen.
Dieser Prozess ist fehleranfällig, zeitaufwendig und aus Sicht der Sicherheit nicht besonders elegant.
Damit schreit das Ganze förmlich nach Automatisierung.
Wie praktisch wäre es, eine bestimmte Rolle zu seiner Klasse automatisch anhand eines Attributs im Benutzerobjekt eines Lehrers zuzuweisen?
Bevor wir uns jedoch einen möglichen Ansatz zur Automatisierung anschauen, betrachten wir zunächst die manuellen Schritte, die erforderlich sind, wenn dieser Prozess ohne jegliche Automatisierung durchgeführt wird.
Diese Schritte wären für jeden Lehrer und für jede Klasse notwendig:
- Beantragung und Genehmigung
- Auswahl der Administrative Unit
- Auswahl der Rolle
- Auswahl des Benutzers
- Festlegen, ob die Zuweisung eligible oder permanent ist
Überlegungen für Automatisierung
Das Ganze muss für jede einzelne Administrative Unit durchgeführt werden. Das ist zeitaufwendig, mühsam und äußerst fehleranfällig.
Schauen wir uns nun die Automatisierung an und betrachten, was erforderlich ist, um diesen Prozess zu automatisieren.
Ziel ist es, sicherzustellen, dass Benutzer, deren Attribut employeeType den Wert „Teacher“ enthält und deren Department-Attribut eine Schulklasse repräsentiert, automatisch administrative Berechtigungen für genau die Administrative Unit erhalten, die dieser Klasse entspricht.
Um diese Automatisierung umzusetzen, benötigen wir die folgenden Komponenten aus Microsoft Entra ID und Entra Governance:
• PIM group - enthält die Rollenzuweisung für die klassenspezifischen Administrative Units
• Access Package - enthält die PIM-Gruppe
• Lifecycle Workflow für jede Schulklasse
Der Workflow wird durch eine Änderung des Department-Attributs ausgelöst, das die Schulklasse enthält. Die betroffenen Benutzerkonten werden dem entsprechenden Access Package zugewiesen und erhalten dadurch die darin enthaltene PIM-Gruppe.
Die einzelnen Schritte, die zum Einrichten dieser Automatisierung erforderlich sind, werden im Folgenden beschrieben.
Einrichten der Gruppe in PIM
Zunächst benötigen wir die Gruppe. Bei der Erstellung der Gruppe ist darauf zu achten, dass die Option aktiviert wird, die es erlaubt, dieser Gruppe Rollen zuzuweisen.
Figure 3: Create a security group with the role assignment option
Als Nächstes wechseln wir in das PIM-Dashboard. Dort muss die neu erstellte Gruppe über den Discovery-Prozess verfügbar gemacht werden.
Figure 4: Discover new groups in the PIM-Dashboard
Dies erfolgt über die Option „Discover groups“, die alle Gruppen im Tenant auflistet, die mit der Option erstellt wurden, ihnen Rollen zuzuweisen, wie im vorherigen Schritt bei der Gruppenerstellung gezeigt.
Für das folgende Beispiel konzentrieren wir uns auf eine einzelne Schulklasse. Zu diesem Zweck haben wir eine PIM-Gruppe mit dem Namen „PIM_Class_8a_Objects“ erstellt, wie in der oben dargestellten Abbildung zu sehen ist.
Gruppenzuweisungsstrategie
Es gibt zwei unterschiedliche Strategien, um in PIM eine Gruppe mit einer Rolle zu verbinden – oder anders ausgedrückt, um die Beziehung zwischen einem Benutzer und einer administrativen Rolle herzustellen. Eine detaillierte Erläuterung beider Ansätze findet sich in meinem Blogartikel: Demystifying Assignment Strategies with ‘PIM for Groups’
In diesem Beispiel weisen wir der Gruppe die Rolle als aktive Zuweisung zu. Über den Lifecycle Workflow und das Access Package werden die Lehrer der PIM-Gruppe als aktive Mitglieder hinzugefügt. In diesem Szenario sind eligible Zuweisungen somit nicht erforderlich.
Dazu bleiben wir im PIM-Dashboard und navigieren zu Roles, anschließend zu Assignments, wo wir der Gruppe die Rolle „User Administrator“ als aktive Zuweisung zuweisen. Wichtig ist hierbei, als Scope nicht „Directory“ auszuwählen, sondern stattdessen die entsprechende Administrative Unit der Klasse 8a zu wählen.
Mit dieser Konfiguration erhalten alle Benutzer, die eine Zuweisung in der Gruppe haben, die Rolle User Administrator, beschränkt auf die Administrative Unit der Klasse 8a.
Figure 5: User Administator role assignment to specific class AU
An dieser Stelle sind wir mit PIM zunächst fertig. Würden wir uns gegen eine Automatisierung entscheiden und alles manuell handhaben wollen, könnten wir den Benutzern jetzt eine eligible-Mitgliedschaft in der Gruppe zuweisen.
Da unser Ziel jedoch die Automatisierung ist, verlassen wir PIM an dieser Stelle und wenden uns nun der Komponente zu, die die Automatisierung tatsächlich umsetzt.
Entra Governance einrichten
Access Package
Um das Access Package zu erstellen, navigieren wir im Entra Admin Center zu Identity Governance.
Die Erstellung eines Access Packages ist einfach und intuitiv. In unserem Fall haben wir für jede Klassenkonstellation ein eigenes Access Package erstellt …
Figure 6: Each class has its own Access Package
… in unserem Beispiel enthält das Access Package lediglich die Gruppe als Ressource. Dieses ließe sich jedoch problemlos erweitern, etwa durch zusätzliche Policies oder weitere Ressourcen, die in das Access Package aufgenommen werden.
Figure 7: Access Package contains PIM-Group
In Szenarien, in denen Administratoren nur temporär tätig sind und sich Zuweisungen häufig ändern, kann ein solcher dynamischer Ansatz hilfreich sein und bringt nicht zwangsläufig ein signifikantes Risiko mit sich.
Lifecycle Workflow
Der Lifecycle Workflow ist das Herzstück dieses Ansatzes. Als Trigger-Typ verwenden wir eine Änderung am Department-Attribut, wobei sich hierfür auch viele andere Attribute eignen würden.
Beim Erstellen eines Workflows müssen wir zunächst ein Template auswählen. Abhängig vom gewählten Template stehen unterschiedliche Optionen zur Verfügung, um den Scope, das Trigger-Attribut und die Tasks zu definieren. Auch die verfügbaren Tasks variieren je nach ausgewähltem Template.
Für unseren Anwendungsfall wählen wir das Template „Mover“.
Figure 8: Lifecycle Workflow Template
In diesem Beispiel halten wir die Tasks bewusst minimal, da das Hauptziel die Zuweisung der administrativen Rolle für eine Administrative Unit ist.
Als ersten Task belassen wir den Standard-Task, der eine E-Mail-Benachrichtigung an den Manager sendet, um darüber zu informieren, dass eine Änderung stattgefunden hat. Anschließend fügen wir einen weiteren Task hinzu, um alle anderen Access Packages zu entfernen.
In unserem Beispiel betrifft dies die Klassen, denen der Lehrer aktuell zugeordnet sein könnte. In diesem Szenario gibt es nur zwei Klassen, sodass dies die Klasse 7b wäre.
Figure 9: Workflow task to remove existing access packages
Abschließend wird das Access Package zugewiesen, für das dieser Workflow ausgelöst wurde. In unserem Beispiel ist dies das Access Package für die Klasse 8a.
Figure 10:Workflow task that assigns the appropriate access package
Damit sind alle erforderlichen Konfigurationen abgeschlossen.
Wenn wir nun das Department-Attribut für ein Benutzerkonto ändern, dessen employeeType auf Teacher gesetzt ist, erhält der Benutzer automatisch das Access Package, das der im Department-Attribut des Benutzerobjekts angegebenen Schulklasse entspricht.
Dabei ist es wichtig, dass die Werte in den Benutzereigenschaften konsistent gepflegt sind, da String-Vergleiche in Lifecycle Workflows sehr strikt sind.
Besondere Aufmerksamkeit ist auch den Einstellungen der Workflow-Tasks zu widmen. So kann es beispielsweise vorkommen, dass beim Entfernen bestehender Access Packages das Benutzerkonto des Lehrers dieses Access Package gar nicht besitzt. Ebenso kann es sein, dass für den Benutzer kein Manager für den E-Mail-Versand hinterlegt ist oder das entsprechende Attribut im Benutzerkonto fehlt. In solchen Fällen würde der Workflow fehlschlagen und die Ausführung abbrechen.
Dies lässt sich vermeiden, indem die Option „Continue workflow execution on error“ aktiviert wird. Ist diese Option für alle Tasks enabled, wird sichergestellt, dass der Workflow auch dann fortgesetzt wird, wenn einzelne Tasks auf Fehler stoßen.
Workflow in Aktion
Betrachten wir nun das Benutzerkonto von Vanessa. Aktuell ist sie die Klassenlehrerin der Klasse 7b. Ab sofort übernimmt sie die Klasse 8a und damit auch die administrativen Aufgaben für die Schülerkonten in der entsprechenden Administrative Unit.
Figure 11:User properties that triggers the Lifecycle Workflow
Beim nächsten Durchlauf des Workflows wird diese Änderung erkannt und der Workflow ausgelöst. Die Ergebnisse der Workflow-Ausführung sehen wie folgt aus.
Figure 12:After Workflow run Teacher has assigned access packages
Ein Blick in das Access Package zeigt die neuen Zuweisungen. Vanessa ist nun ebenfalls enthalten.
Figure 13:Workflow History shows what happened
Basierend auf den Zuweisungen, die die jeweiligen PIM-Gruppen auf den Administrative Units haben, kann Vanessa nun die Schülerkonten in der Administrative Unit der Klasse 8a verwalten.
Über das Portal mystaff.microsoft.com sieht Vanessa alle Administrative Units, für die sie über administrative Berechtigungen verfügt.
Figure 14:Teacher “mystaff” Web ´Site
Die Benutzerkonten innerhalb dieser Administrative Units können anschließend entsprechend verwaltet werden.
Figure 15:Students from AU for Teacher administration
Nutzt sie stattdessen das Entra Admin Center, kann sie basierend auf ihrer administrativen Rolle alle Administrative Units sowie die darin enthaltenen Benutzer sehen. In der Administrative Unit der Klasse 7b sind die Optionen zum Bearbeiten der Benutzerkonten jedoch deaktiviert.
Figure 16:Student outside Teacher scope cannot be edited
Im Gegensatz dazu ist das Bearbeiten in der Administrative Unit der Klasse 8a möglich.
Figure 17:Users in the teacher’s scope can be edited
Weitere Ideen
Dieses Beispiel ist bewusst einfach gehalten, lässt sich jedoch je nach Anwendungsfall problemlos erweitern. Ist ein Lehrer beispielsweise für mehrere Schulklassen verantwortlich, kann der Scope entsprechend angepasst werden. In diesem Fall wäre im Lifecycle Workflow der Operator „eq“ nicht mehr ausreichend. Stattdessen kann der Operator „in“ verwendet werden, um eine Klasse aus einer Liste von Klassen abzugleichen.
Zusammenfassung
Es ist sicherlich sinnvoll, dass administrative Rollen nicht automatisch und ohne weitere Kontrolle zugewiesen oder entzogen werden. Dennoch gibt es immer wieder Sonderfälle, in denen eine solche Automatisierung durchaus sinnvoll ist.
Der hier vorgestellte Ansatz zeigt eine Möglichkeit, mit diesen Szenarien umzugehen. Access Packages und Lifecycle Workflows sind Governance-Funktionen und erfordern daher eine entsprechende Lizenzierung. Stehen diese Lizenzen nicht zur Verfügung, kann alternativ auch eine Logic App eingesetzt werden.
Die PIM-bezogenen Aspekte rund um Administrative Units bleiben in beiden Fällen identisch. Der einzige Unterschied besteht darin, wie das Access Package den Lehrern zugewiesen wird – was in dieser Lösung über Governance-Funktionalitäten erfolgt und sehr einfach umzusetzen ist.
Cover image: “Designed by vectorjuice / Freepik”